Class Sessions
Create a virtual classroom where students join by code and you monitor AI conversations in real time.
Overview
Class Sessions are the foundation of live teaching with Chat Everywhere. When you create a session, students join using a simple code, and you get a real-time view of every AI conversation happening in your class. From the session, you can share prompt templates, assign quizzes, open a group chat, and review what students are doing with AI — all as it happens.
After the session ends, you can still review the conversations that were collected while Collect student conversations was turned on.
New to Class Sessions? Follow Your First Class for a short step-by-step walkthrough.
How to Access
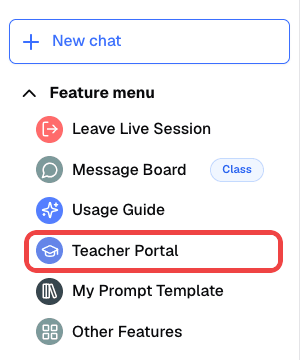
- In the sidebar of the chat page, click Teacher Portal
-
The Teacher Portal opens on the Class Sessions page
-
Click Start new session

Creating a Session
- Click Start new session on the Class Sessions page
- Enter a Session name (for example, “Biology Period 3” or “English Writing Workshop”)
- Under Session duration, choose 1 hour, 2 hours, 4 hours, 1 day, 3 days, or 7 days, or set a custom length between 1 hour and 7 days
- Adjust the options described in Session Settings
- Click Add Session
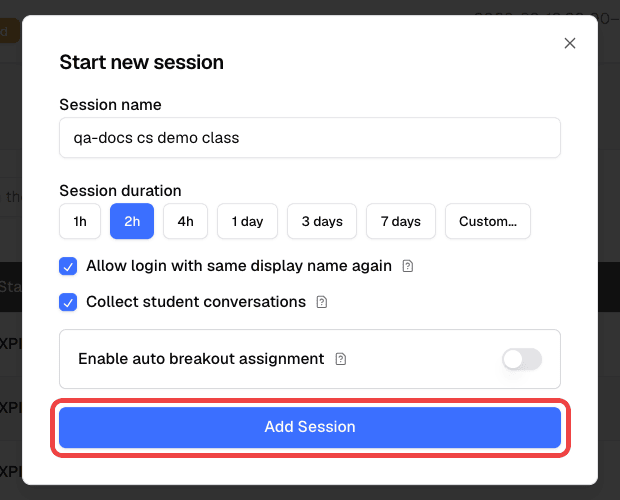
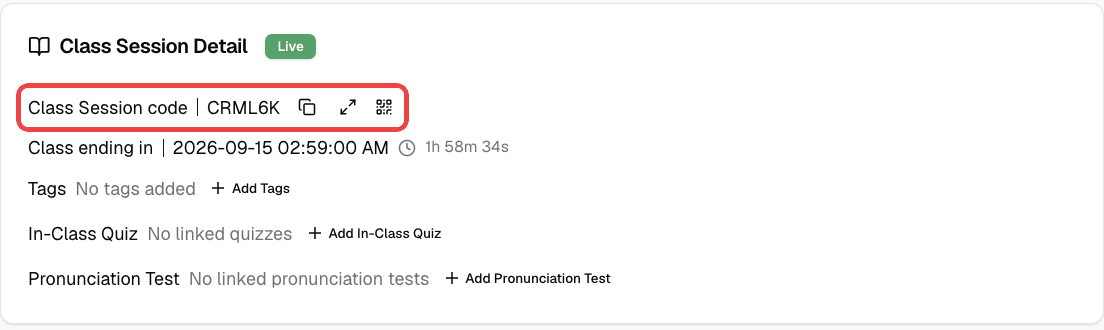
The session starts right away, and the system generates a unique one-time code for you to share with students.
To set up a session that starts later, use Schedule Session instead. See Scheduling a Session.
Session Settings
When creating a session, you can configure the following options. Allow login with same display name again and Collect student conversations are on by default. Enable auto breakout assignment is off by default.
Allow login with same display name again
When this is turned on, a student who leaves and comes back can rejoin by entering the same display name they used earlier. They pick up right where they left off — their previous conversations, breakout room assignment, and other data are all restored. The student sees a message confirming they have rejoined.
When this is turned off, every login creates a brand-new account, even if the student types the same name. The student starts fresh each time with no access to anything from their previous visit.
Collect student conversations
When this is turned on, students’ AI chat messages during the session are shared with you. You can view each student’s conversation from the session detail page and export chat history after the session ends.
When this is turned off, student conversations remain private. You will not be able to view or export their AI chat messages from the session, even after it ends.
See Student Data and Privacy for exactly what is collected.
Enable auto breakout assignment
When this is turned on, students are placed into breakout rooms automatically as they join. Set Max students per group to a number from 2 to 30. See Session Chat Rooms for details.
Changing settings later
While a session is live, you can change the auto breakout settings from the session detail page. Changes only affect students who join afterward. The other settings stay fixed for the rest of the session. To change them, end the session, then open the History tab and click Restart session. There you can adjust the duration and all session options.
How Students Join
Students can join your session in two ways:
Option 1: Enter the code manually
- The student opens Chat Everywhere at v2.chateverywhere.app
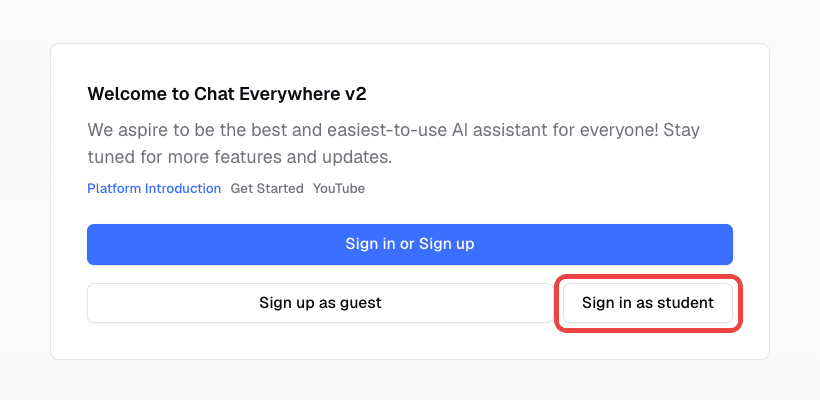
- The student clicks Sign in as student, then enters a display name and the one-time code you provided
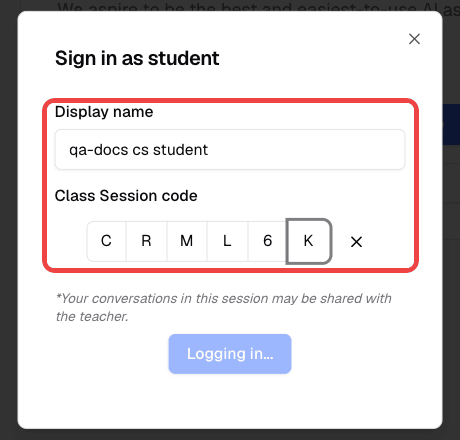
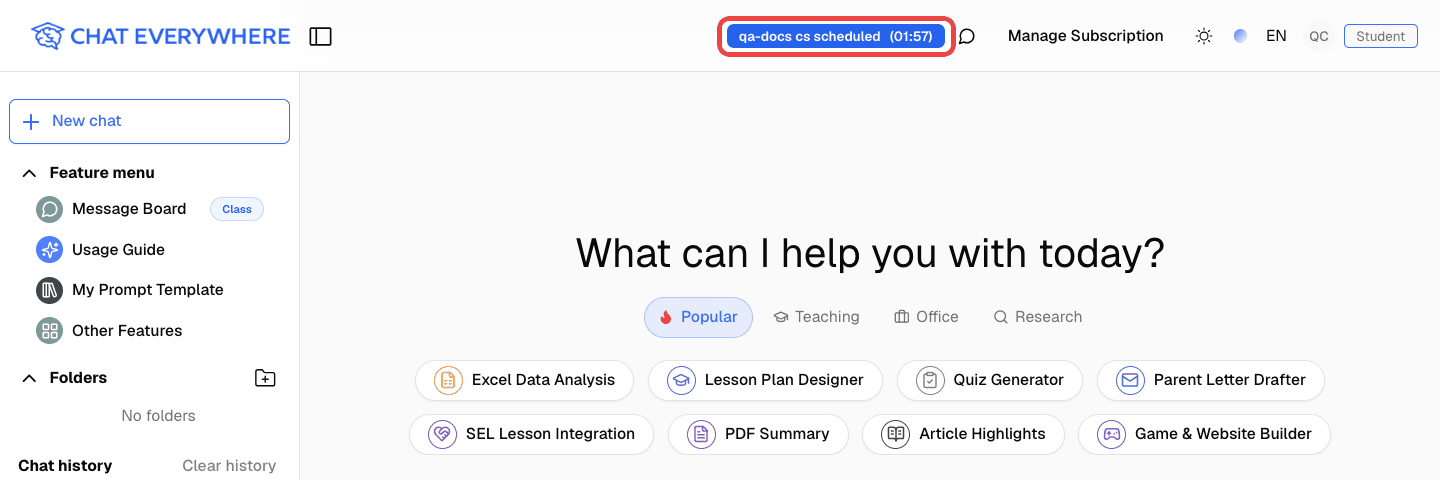
- The student clicks Login and lands on the chat page for your class
Option 2: Share a link or QR code
Copy the class link, or open the QR code from the session row and let students scan it. The link includes your code as a ?sessionCode= parameter, so the code is filled in automatically. Students only need to enter their display name and log in.
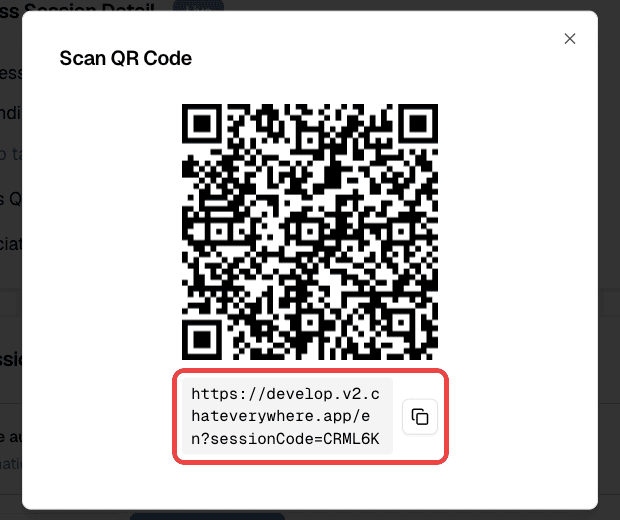
Tip: Project the join code or QR code on your classroom screen, or write the code on the board. Students only need to enter it once per session.
Reusing a Class Link and Restoring Student History
To reuse the same class link or QR code for a follow-up lesson:
- When you start the session, keep Allow login with same display name again and Collect student conversations turned on.
- Ask students to use a stable display name, such as their student number or full name.
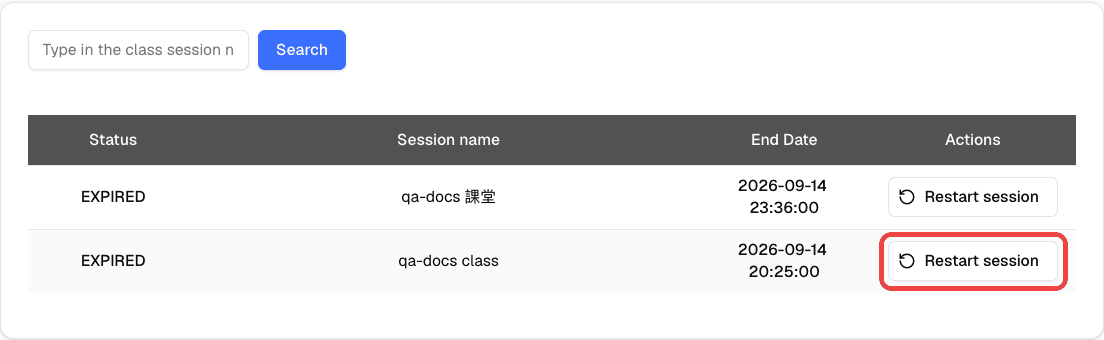
- Before the next lesson, find the session in the History tab, click Restart session, and keep the same options.
- Students rejoin with the same display name to restore their previous class identity and conversation history.
This helps when students close their browser by mistake, switch devices during class, or need to continue an AI conversation they already started. For a full checklist with screenshots, see Troubleshooting.
Session Lifecycle and Limits
A session is scheduled (waiting to start), live (students can join), or ended (listed under History).
Limits at a Glance
| Limit | Value |
|---|---|
| Session length | 1 hour to 7 days |
| Active sessions (live and scheduled together) | Up to 2 |
| Live sessions at the same time | 1 |
| Overlapping session times | Not allowed |
| Students in one session | Your account’s student limit, shown next to Joined Accounts |
| Session code after the session ends | Cleared about 3 months later |
Start new session is unavailable while you already have a live session (“You already have a live session in progress. Please end it before starting a new one.”) or when your account has no student slots (“You do not have available student slots”). Schedule Session is unavailable once you have 2 active sessions.
Scheduling a Session
- On the Class Sessions page, click Schedule Session
- Enter a Session name and choose the start date and time. The start time must be in the future.
- Choose a Session duration and the session settings
- Click Schedule Session
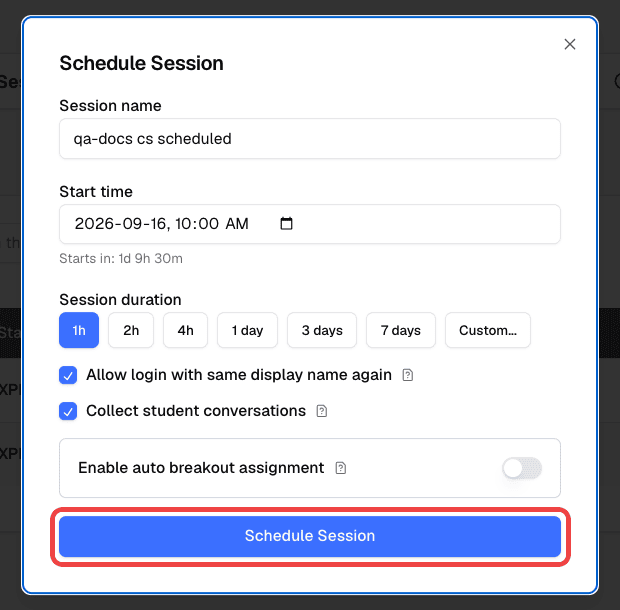
The session appears in your active sessions with its start time. When the start time arrives, it goes live automatically. It does not start while another of your sessions is still live.
Before it starts, you can use the buttons on the session row:
- Start Now — choose a duration and start the session immediately. This button is hidden while you have another live session.
- Remove Scheduled Session — delete the scheduled session. This cannot be undone.
- Cancel Schedule — shown instead of Remove for an ended session that you scheduled again from Restart session. The session goes back to History, and you can schedule it again later.

If students enter the code before the start time, they see “Session hasn’t started yet”.
Restarting an Ended Session
You can run an ended session again instead of creating a new one.
- Open the History tab and click Restart session on the session (or open the ended session and click the same button)
- Edit the Session name if needed
- Under Restart mode, choose Start Now or Schedule for later
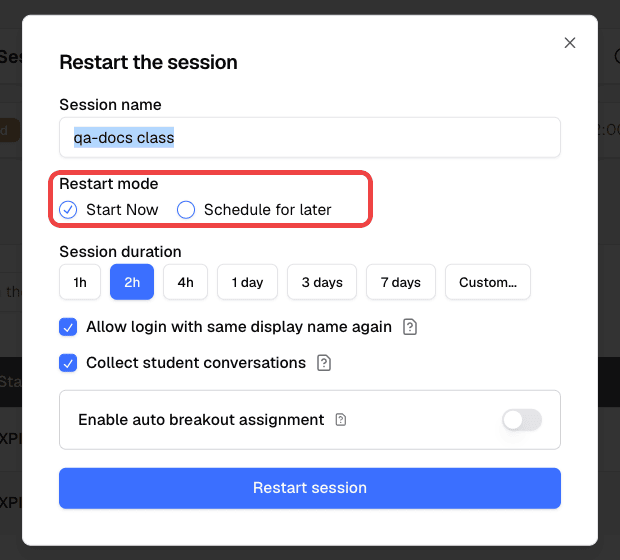
- Choose a Session duration and adjust any of the three session settings
- Click Restart session (or Schedule for later)
The session keeps its existing code, so your class link and QR code keep working. If the code has already been cleared (about 3 months after the session ended), a new code is generated. A restarted session counts toward the 2 active sessions and cannot overlap with your other sessions.
When the Class Is Full
Each session admits up to your account’s student limit. The count next to Joined Accounts shows online accounts out of that limit, for example 12 / 30.
- Only online accounts count. You, as the session owner, are not counted. Other teachers who join your session are counted.
- When the limit is reached, new students see “Class session is full”.
- A student who went offline and signs in again also needs a free spot.
Monitoring a Live Session
Open your live session from the Class Sessions list. The session detail page shows the class code, end time, tags, linked activities, chat rooms, and the accounts that have joined.
This lets you:
- Check whether students are on-task
- Spot students who need help
- Identify interesting AI responses worth discussing with the class
Checking Who Is Online
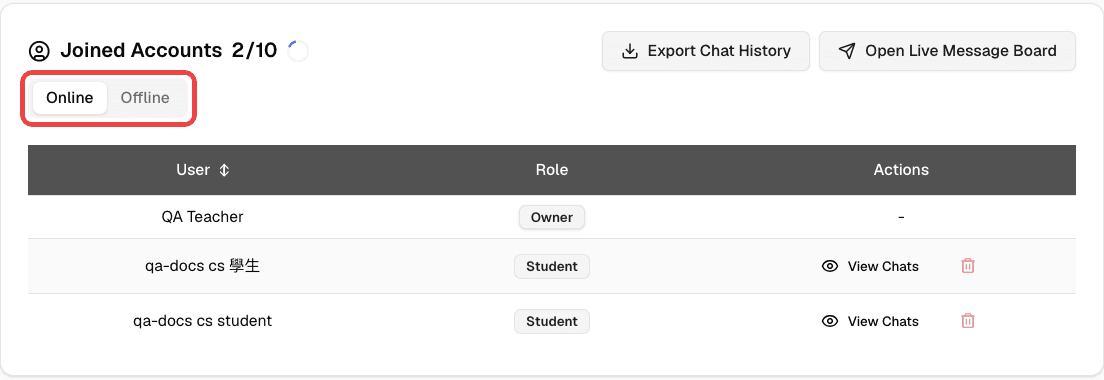
The Joined Accounts card lists everyone in the session and refreshes about every 10 seconds.
- Online — accounts currently in the session
- Offline — accounts that joined earlier but are no longer in the session, for example students who left
Reading Student Conversations
- In Joined Accounts, find the student
- Click View Chats
- Select a chat to read it
View Chats is unavailable for students whose conversations are not collected. See Student Data and Privacy.
Copying Class Details
Next to Class Session code:
- Click the copy icon, then choose Copy session code, Copy link, or Copy all details. Copy all details copies the class title, class link, one-time code, and class end time, ready to paste into a message to students.
- Click the expand icon to show the code in large text for projecting.
- Click the QR code icon to open Scan QR Code.
Exporting Chat History
- In the Joined Accounts card, click Export Chat History
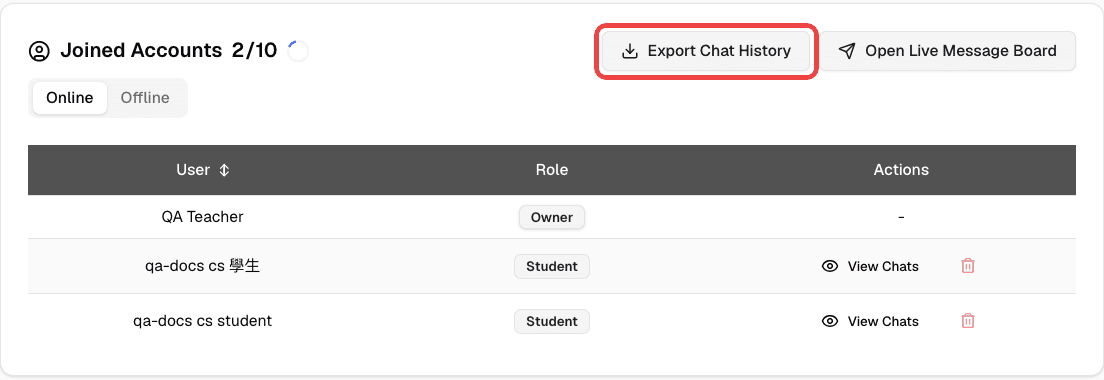
- An Excel file (
.xlsx) downloads to your device
The file includes only students whose conversations were collected. If no students qualify, you see “No students with chat sharing consent found”. You can export during the session or after it ends.
Tagging Student Posts
Session tags are applied to the posts students send to the Message Board during this session.
- While the session is live, click Add Tags next to Tags
- Choose the tags and save
- In the Update Tags dialog, choose:
- Update All Messages — also apply the new tags to posts students already sent in this session. Their existing tags are replaced.
- Only Upcoming Messages — leave earlier posts unchanged
See Tag Management to create tags.
Linking Quizzes and Pronunciation Tests
While the session is live, you can link draft activities from the session detail page:
- Next to In-Class Quiz, click Add In-Class Quiz
- In Select Draft Quizzes, check the quizzes you want
- Click Add Selected Quizzes
For speaking practice, click Add Pronunciation Test next to Pronunciation Test and select draft assignments the same way. Students find linked activities in their Class Portal. See In-Class Quiz and Pronunciation Practicer.
Observing Another Online Class
Teachers can join another teacher’s live session with its session code, for co-teaching or observation, without creating a separate session.
- On the Class Sessions page, click Join a live session

- Enter the session code. Share my chat conversations with the teacher is checked by default; uncheck it if you don’t want the session owner to see your AI chats.
- Click Join Session
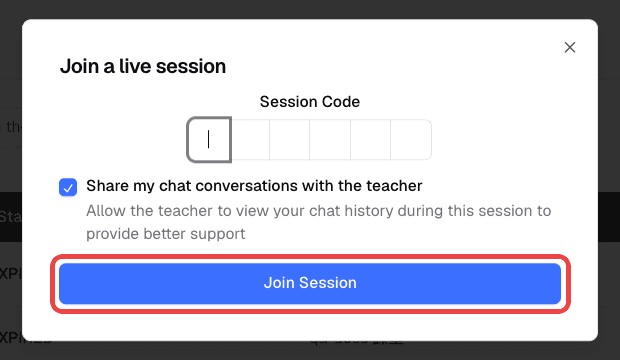
You cannot join when:
- You have a live session of your own (“Cannot join a session while another session is live”)
- The other session has not started yet (“Session hasn’t started yet”)
- The other session’s time overlaps one of your scheduled sessions
- The other session is full. Joining teachers count toward its student limit.
To leave, click Leave Live Session.
Sharing Prompts and Quizzes
During a live session, you can share resources directly with students:
Sharing a Prompt Template:
- Open Prompt Templates in the Teacher Portal
- Turn on the switch in the Status column for the template
- Students in your live sessions get the template in the prompt template list in their chat
See Prompt Templates for details.
Assigning a Quiz:
- In In-Class Quiz, open a generated quiz and choose Publish to Session, then select the session. You can also link draft quizzes from the session detail page, as described in Linking Quizzes and Pronunciation Tests.
- Students in the session see the quiz in their Class Portal and can begin answering
Managing Participants
From the session detail page, you can:
- See who has joined — use the Online and Offline tabs in Joined Accounts
- Remove a student — click the trash icon on the student’s row while the session is live, then confirm. Removing a student who signed in with the class code deletes that account, and it cannot be recovered. Removing any other account only takes it out of the session.
Ending a Session
When class is over:
- Open your live session
- Click End Class Session
- Read the warning and confirm
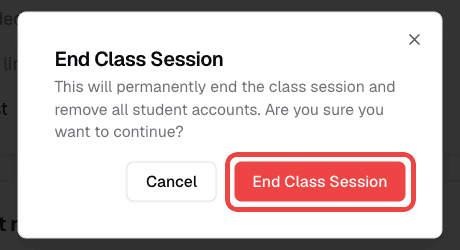
- The session moves to the History tab
A session also ends on its own when it reaches its end time. The same cleanup happens either way.
What happens when a session ends:
- Everyone in the session goes offline, and students can no longer use the session.
- Student accounts created with the class code are removed, so students can no longer use them.
- In-class quizzes linked to the session are ended.
- You can still open the session from History to see who joined, read collected conversations with View Chats, export chat history, and review the chat room history.
- The session code is cleared about 3 months after the session ends. The session page shows the date, for example “This session code will be cleared on 2026-12-14.”
If Allow login with same display name again was on and you restart the session, a returning student who enters the same display name gets their earlier account and conversations back.
Student Data and Privacy
This section describes how the app handles student data in a session. Check your school’s own policies before collecting student conversations.
What Students See When They Join
The Sign in as student dialog shows this notice under the login fields: “Your conversations in this session may be shared with the teacher.” The notice appears in every session, whether or not Collect student conversations is on.
What “Collect student conversations” Collects
When the setting is on:
- AI chats that a student starts while they are in the live session are shared with the session.
- You can read those chats with View Chats and include them in Export Chat History.
Chats a student started before joining, or after the session ended, are not shared. When the setting is off, no AI chats are shared with the session.
Messages in Session Chat Rooms and posts students choose to send to the Message Board are separate features and are not controlled by this setting.
Signing In Again with the Same Display Name
When Allow login with same display name again is on, a student who enters a display name already used in this session signs in to that earlier account, including its conversations. The student sees “Login with existing account”.
Anyone who enters that same name can open that account. Ask students to use names that others won’t type by accident, such as full names or student numbers.
When the setting is off, every sign-in creates a new account.
What Remains After a Session Ends
- Student accounts created with the class code are removed.
- The session, its joined account list, collected conversations, and chat room history stay available to you in History.
- The session code is cleared about 3 months after the session ends.
Who Can Use This
- Teachers — Create, manage, monitor, and end sessions. View collected student conversations during and after the session. This feature requires a Teacher plan.
- Students — Join sessions with a code, use AI chat, and access shared templates and quizzes.
Related Features
- Your First Class — A step-by-step quickstart for your first session
- Session Chat Rooms — A shared group chat for everyone in your session
- Message Board — Students send specific AI responses to you for review
- Prompt Templates — Create structured prompts and share them with students
- In-Class Quiz — Create and assign AI-generated quizzes
Common Questions
Students say they can’t find the join code. Make sure you are sharing the code displayed on the session detail page. You can also share the class link or QR code instead.
I can’t see any student conversations. Students need to actually start chatting with the AI for conversations to appear. Confirm that students have successfully joined (they should appear in Joined Accounts), have started new chats during the session, and that Collect student conversations is turned on.
Can I reuse a session link or QR code? You can reuse the link or QR code while the session is live. For a later lesson, restart the session from the History tab. The code stays the same unless it was cleared about 3 months after the session ended. To let students return without losing their work, keep “Allow login with same display name again” and “Collect student conversations” enabled before students join.
Can students join after the session has started? Yes. Students can join a live session at any time before it ends, as long as the class is not full.
Students see “Class session is full”. The session has reached your account’s student limit. Check the count next to Joined Accounts. Students who left and went offline no longer count.
What happens to student conversations after the session ends? You can still view the AI chats that were collected while “Collect student conversations” was on, from the session detail page. Student accounts created with the class code are removed when the session ends. If you restart the session with “Allow login with same display name again” on, students can get their earlier account back by entering the same display name.
Can I change session settings after students have already joined? During a live session, you can change only the auto breakout settings, from the session detail page. Other settings, such as “Allow login with same display name again” and “Collect student conversations”, stay fixed until the session ends. After that, use Restart session to run it again with a new duration and updated options.