Session Chat Rooms
A shared group chat for everyone in your class session — send messages, share AI responses, and keep the class connected in real time.
Overview
Session Chat Rooms are real-time group chats that connect all participants in a live class session. Teachers and students can send text messages, share files, and broadcast AI responses to the entire group. The chat works as a floating panel that appears on top of whatever page you are on, so you never have to leave your current work to communicate with the class.
The chat room is only available while a class session is active. Once the session ends, teachers can review the full chat history.
How to Access
The chat room appears automatically when you are in an active class session:
- Look for the message icon (a speech bubble) in the top header bar
- Click the icon to open the chat panel
- A red dot appears on the icon when there are unread messages
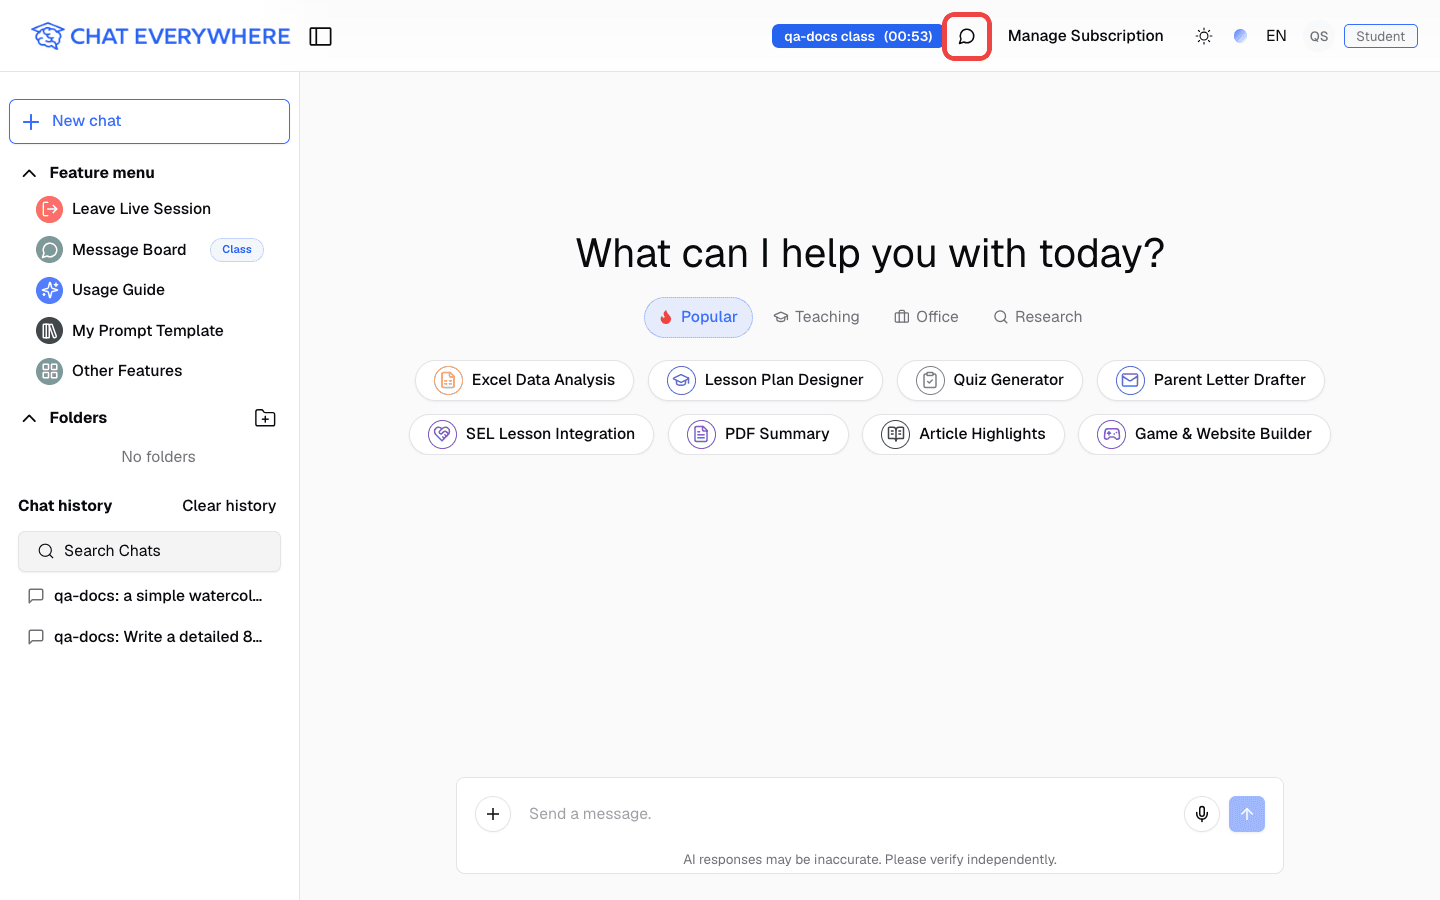
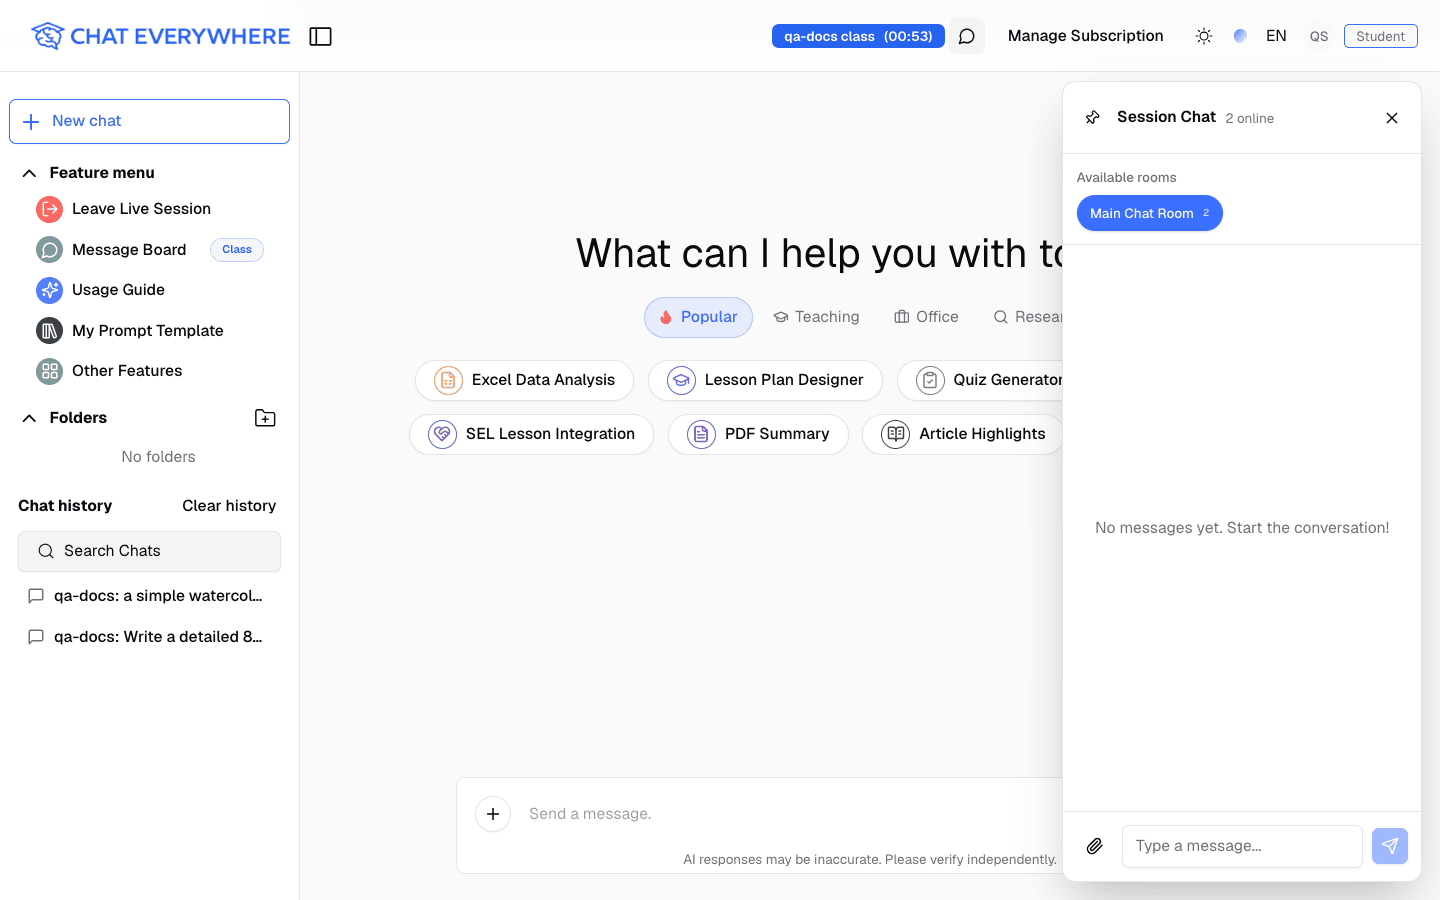
The icon only appears when a live session is active. If you do not see it, confirm that you have joined or created an active session.
Sending Messages
Once the chat panel is open:
- Type your message in the text input at the bottom of the panel
- Press Enter or click Send
- Your message appears immediately for all session members
Text formatting: Messages are rendered as Markdown, so you can use formatting like **bold**, *italic*, lists, and code blocks.
File attachments:
- Click the attachment button to upload a file
- Images are displayed inline in the chat and can be enlarged by clicking on them
- Other file types appear as download links
- Maximum file size is 50 MB
Desktop vs Mobile
On desktop:
- The chat panel opens as a floating overlay that you can drag to reposition anywhere on screen
- You can also pin the panel to the right side of the screen so it stays in place alongside your other work
On mobile:
- The chat opens as a full-screen sheet
- Swipe or tap the close button to return to your previous view
Sharing AI Responses to the Chat
One of the most useful features of Session Chat Rooms is the ability to broadcast an AI response to the entire class.
- In your main AI chat, find a response you want to share
- Click the Send to Chatroom button on that message
- The AI response is posted into the chat room for all members to see
This is helpful when:
- A student gets a particularly good explanation and wants to share it
- The teacher wants to broadcast an AI-generated example to the whole class
- You want to start a class discussion around a specific AI response
Removing Messages
Unsending Your Own Message (Students)
Students can take back a message shortly after sending it:
- Within 30 seconds of sending, click the Unsend message icon (a curved arrow) next to the message time
- In the confirmation dialog, click Unsend
Others will no longer see the original message, and the chat shows Message unsent in its place. This cannot be undone. After 30 seconds, the unsend icon disappears and the message can no longer be unsent.
Deleting Messages (Teachers)
Teachers can remove any message in the chat room, including student messages:
- Click the Delete message icon (a trash can) next to the message time
- The icon changes to a check mark. Click it again within 3 seconds to confirm
If you do not confirm within 3 seconds, the icon resets and nothing is deleted. Once deleted, students no longer see the original message, and the chat keeps a Message deleted by teacher notice in its place.
Breakout Rooms
Breakout Rooms let you automatically split students into smaller group chat rooms during a live session. Instead of one large group chat, students are placed into groups (for example, Group A, Group B, Group C) so they can have focused discussions with a smaller number of classmates.
Enabling Breakout Rooms
You can turn on breakout rooms when creating a session or while a session is in progress:
- Open the session settings
- Toggle Enable auto breakout assignment
- Set the Max students per group (between 2 and 30, default is 4)
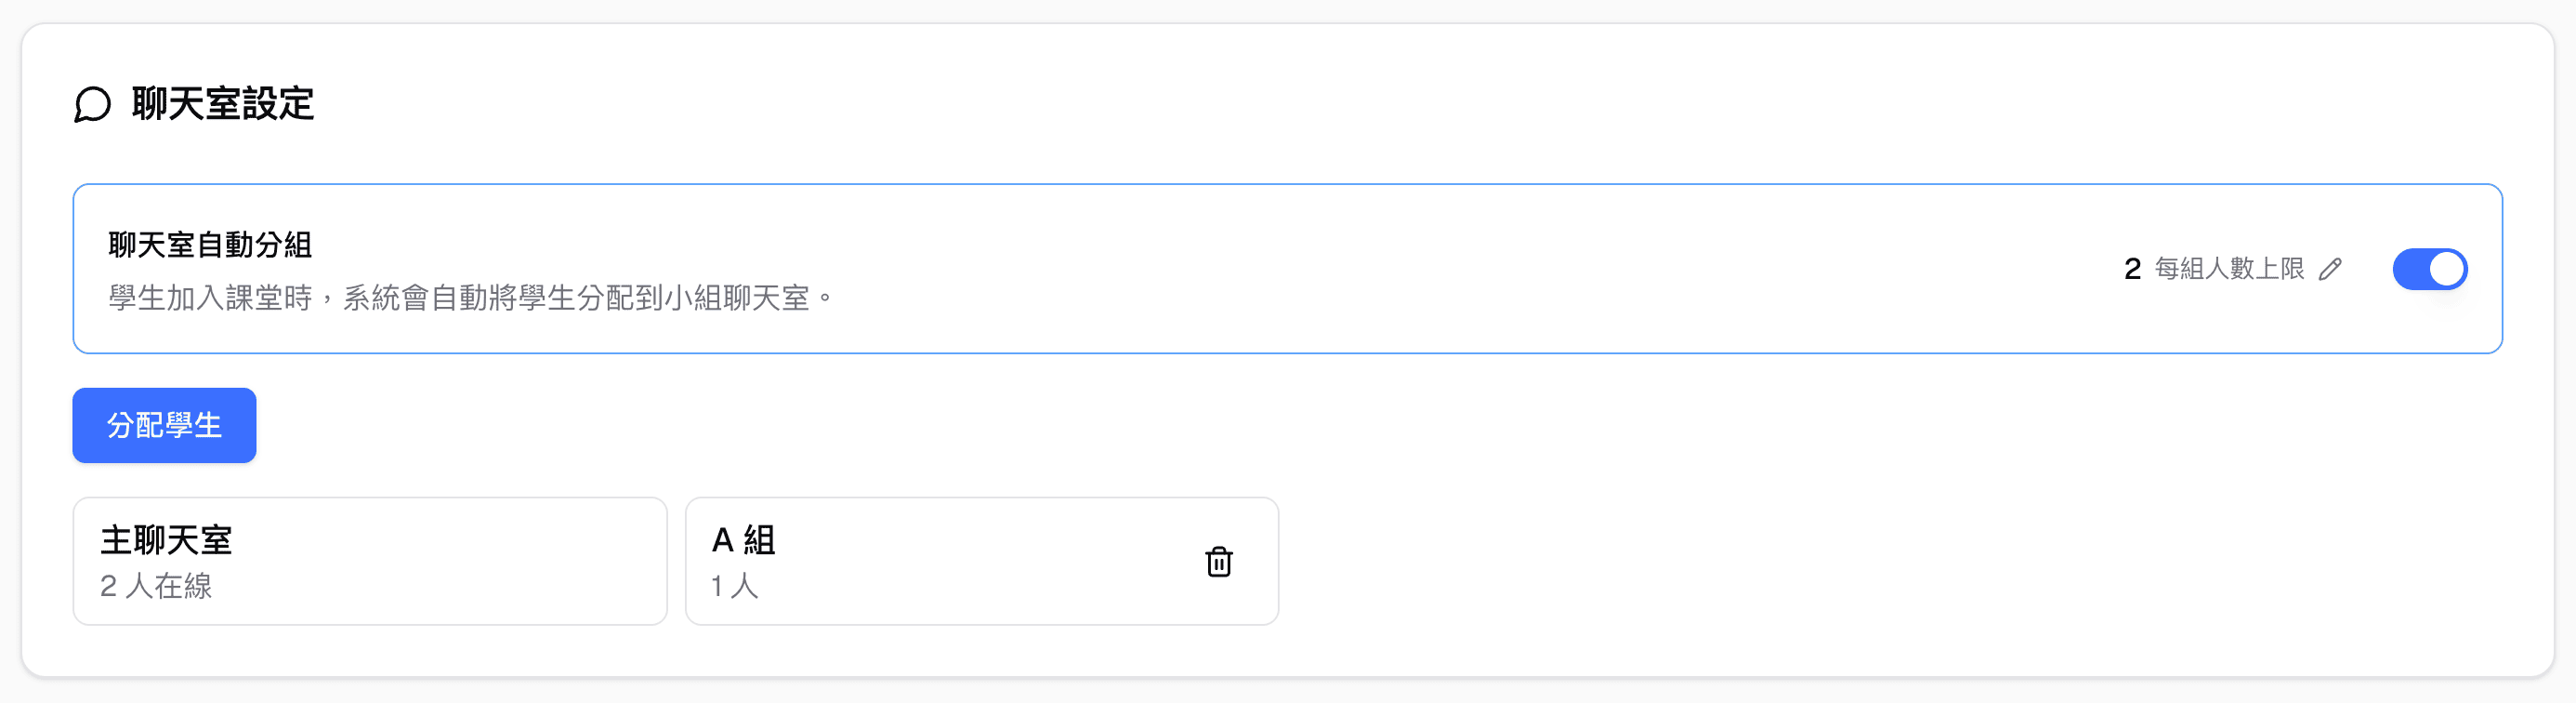
When enabled, students are automatically placed into a group room as they join the session. You do not need to create the rooms yourself — they are generated on the fly as needed.
How Students Are Assigned
When a student joins the session:
- The system checks which group rooms have available space
- The student is placed in the room with the fewest members that still has room
- If every existing room is full, a new group room is created automatically
Group rooms are named alphabetically — Group A, Group B, Group C, and so on through Group Z. If more than 26 groups are needed, rooms continue as Group 27, Group 28, etc.
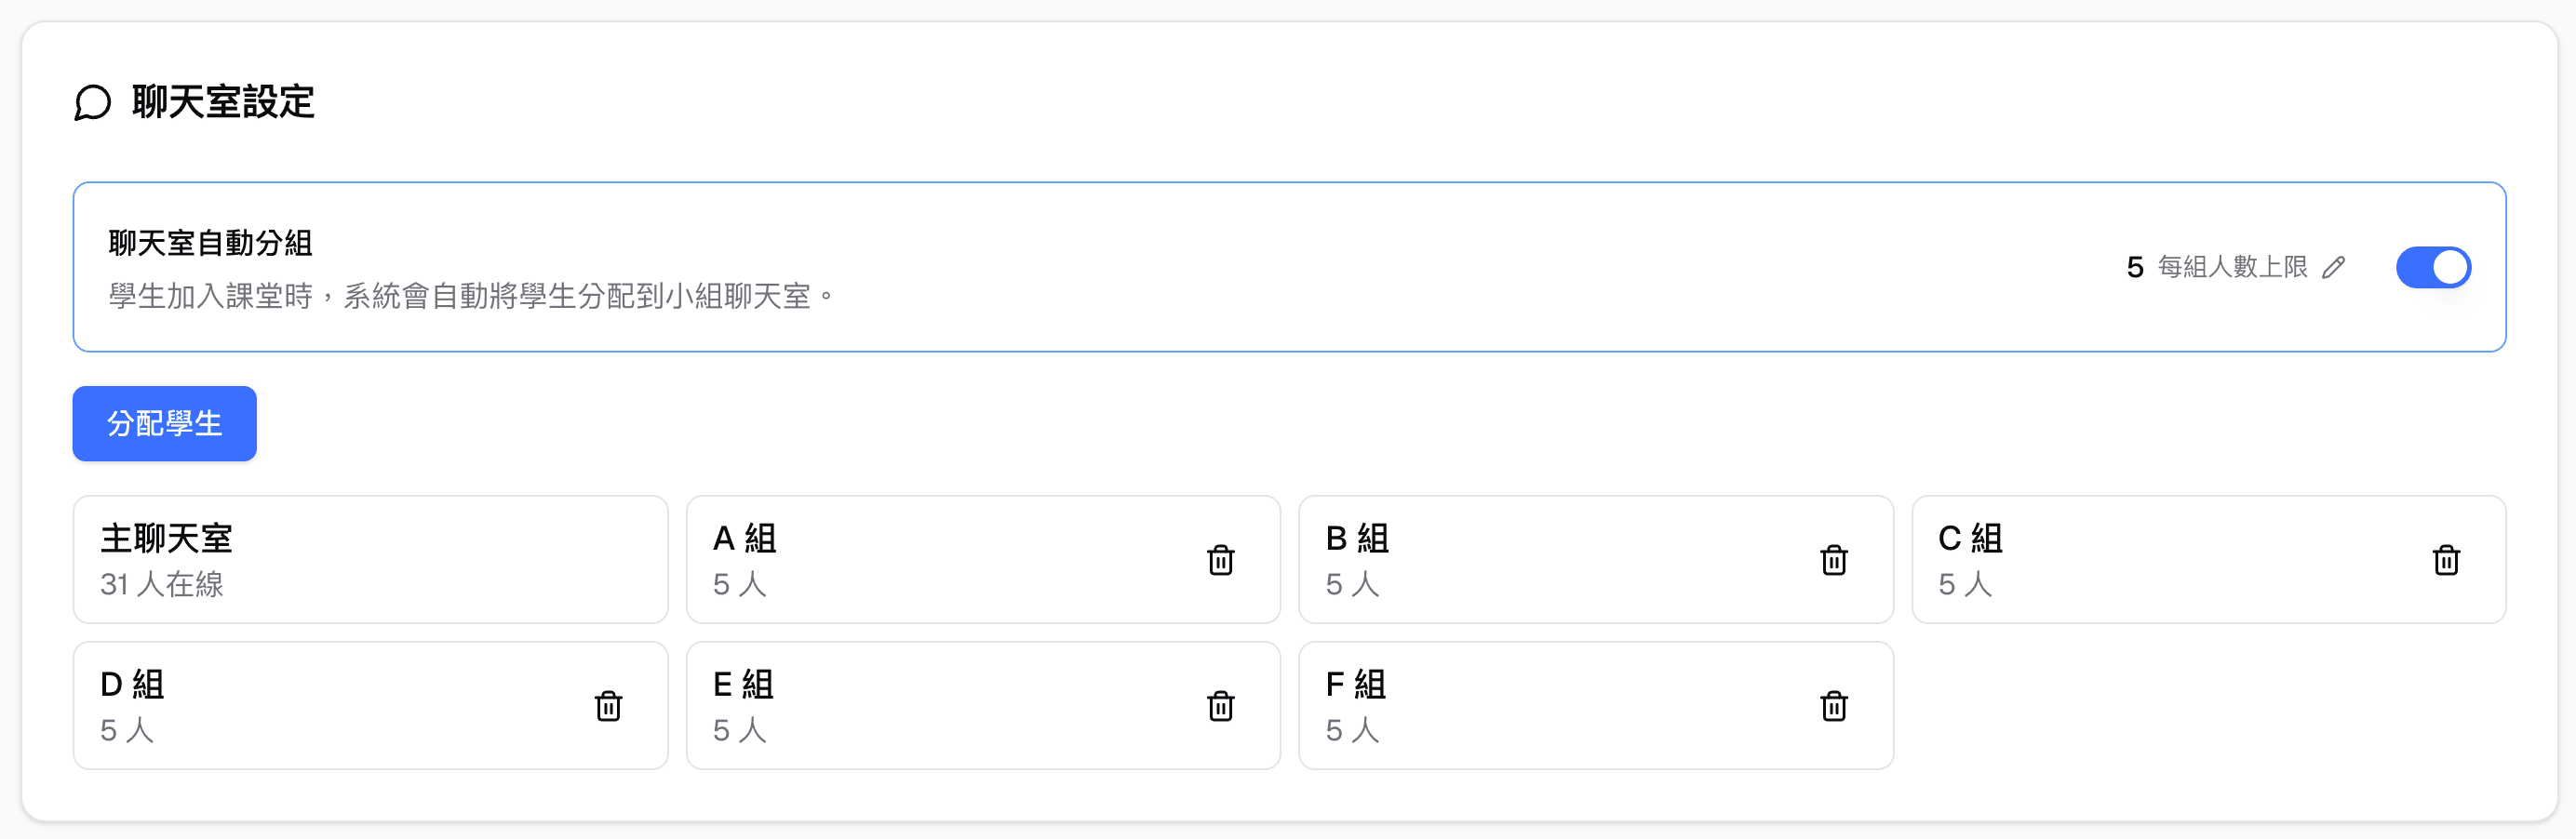
Changing Settings During a Session
You can adjust breakout room settings while a session is live:
- Turn Enable auto breakout assignment on or off at any time
- Change the max students per group — this only affects students who join after the change; existing group assignments stay the same
Auto-Distributing Students
If you want to redistribute students who have already joined:
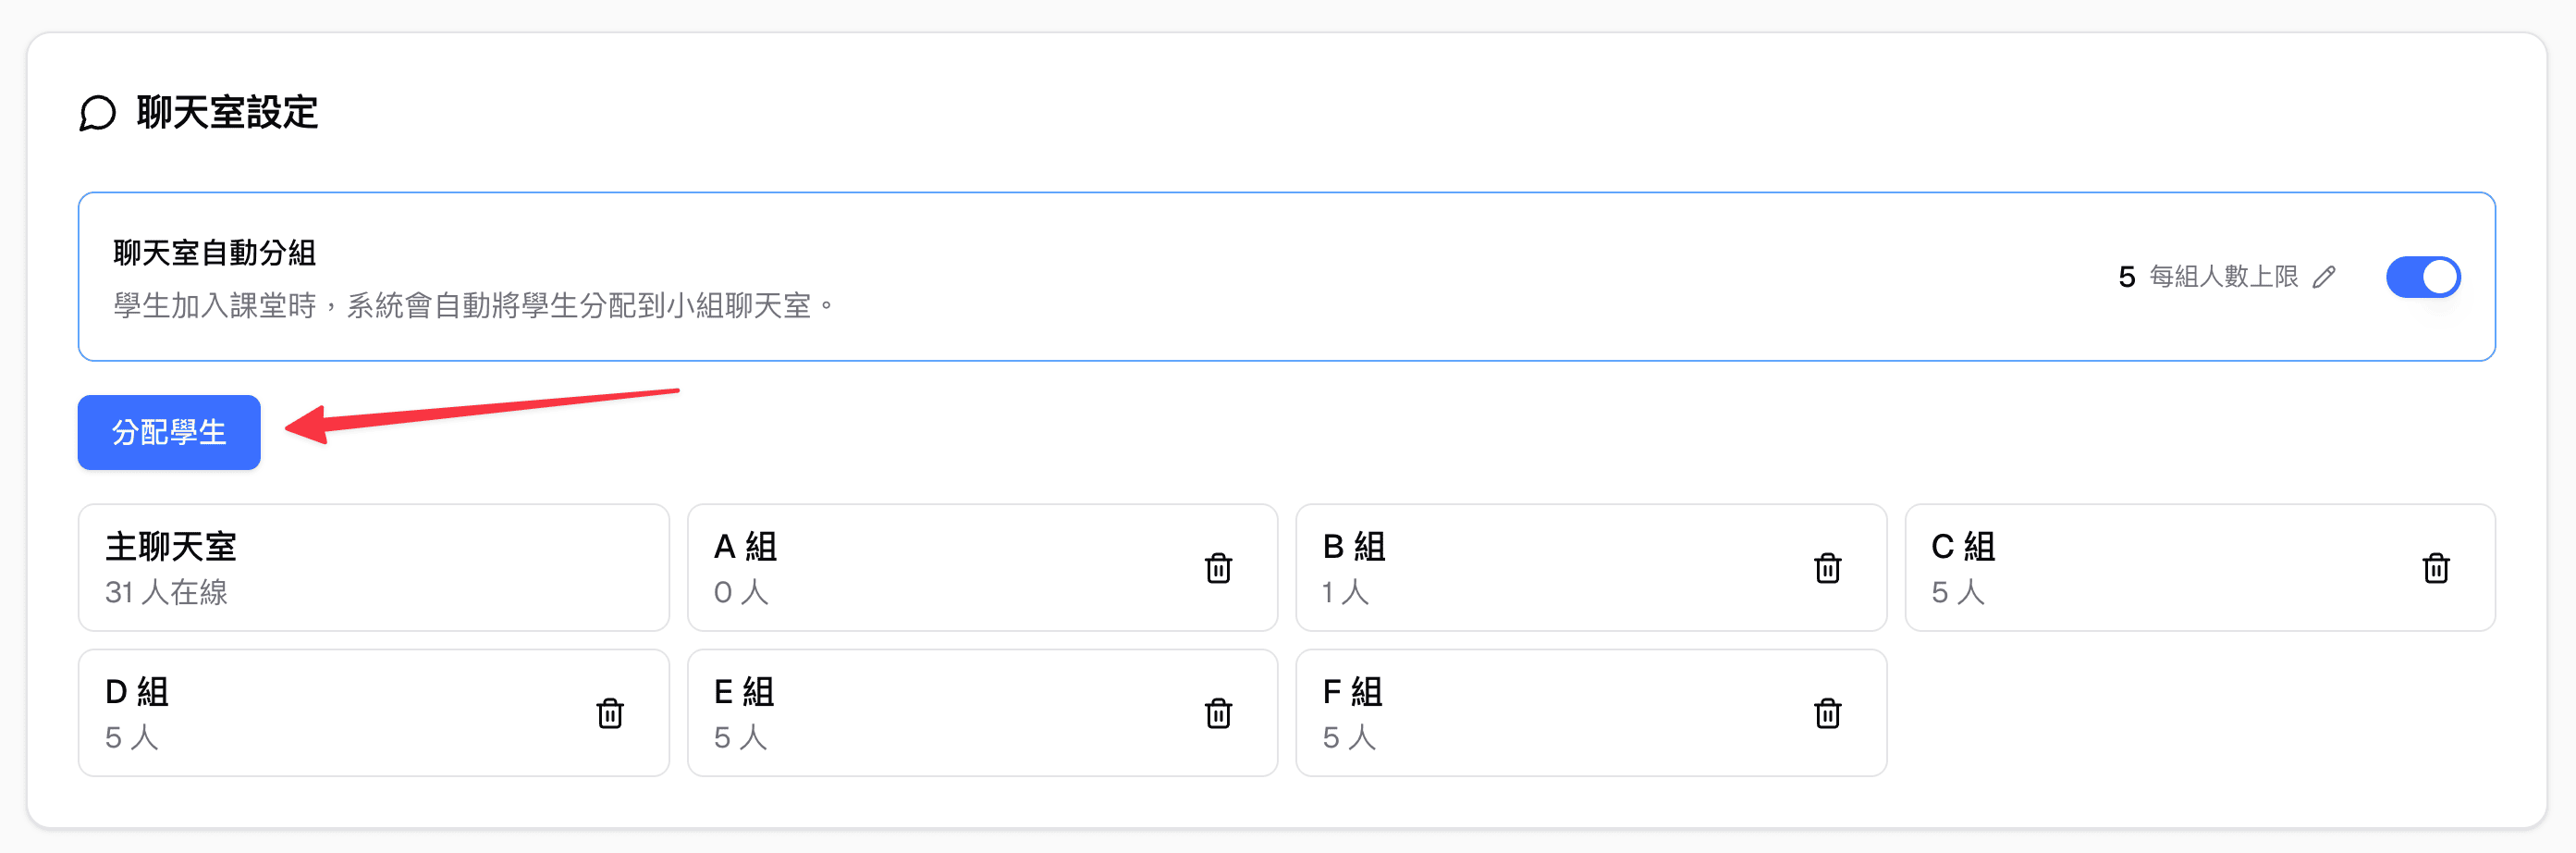
- Click the Assign students button in the Session chat rooms card on the session detail page
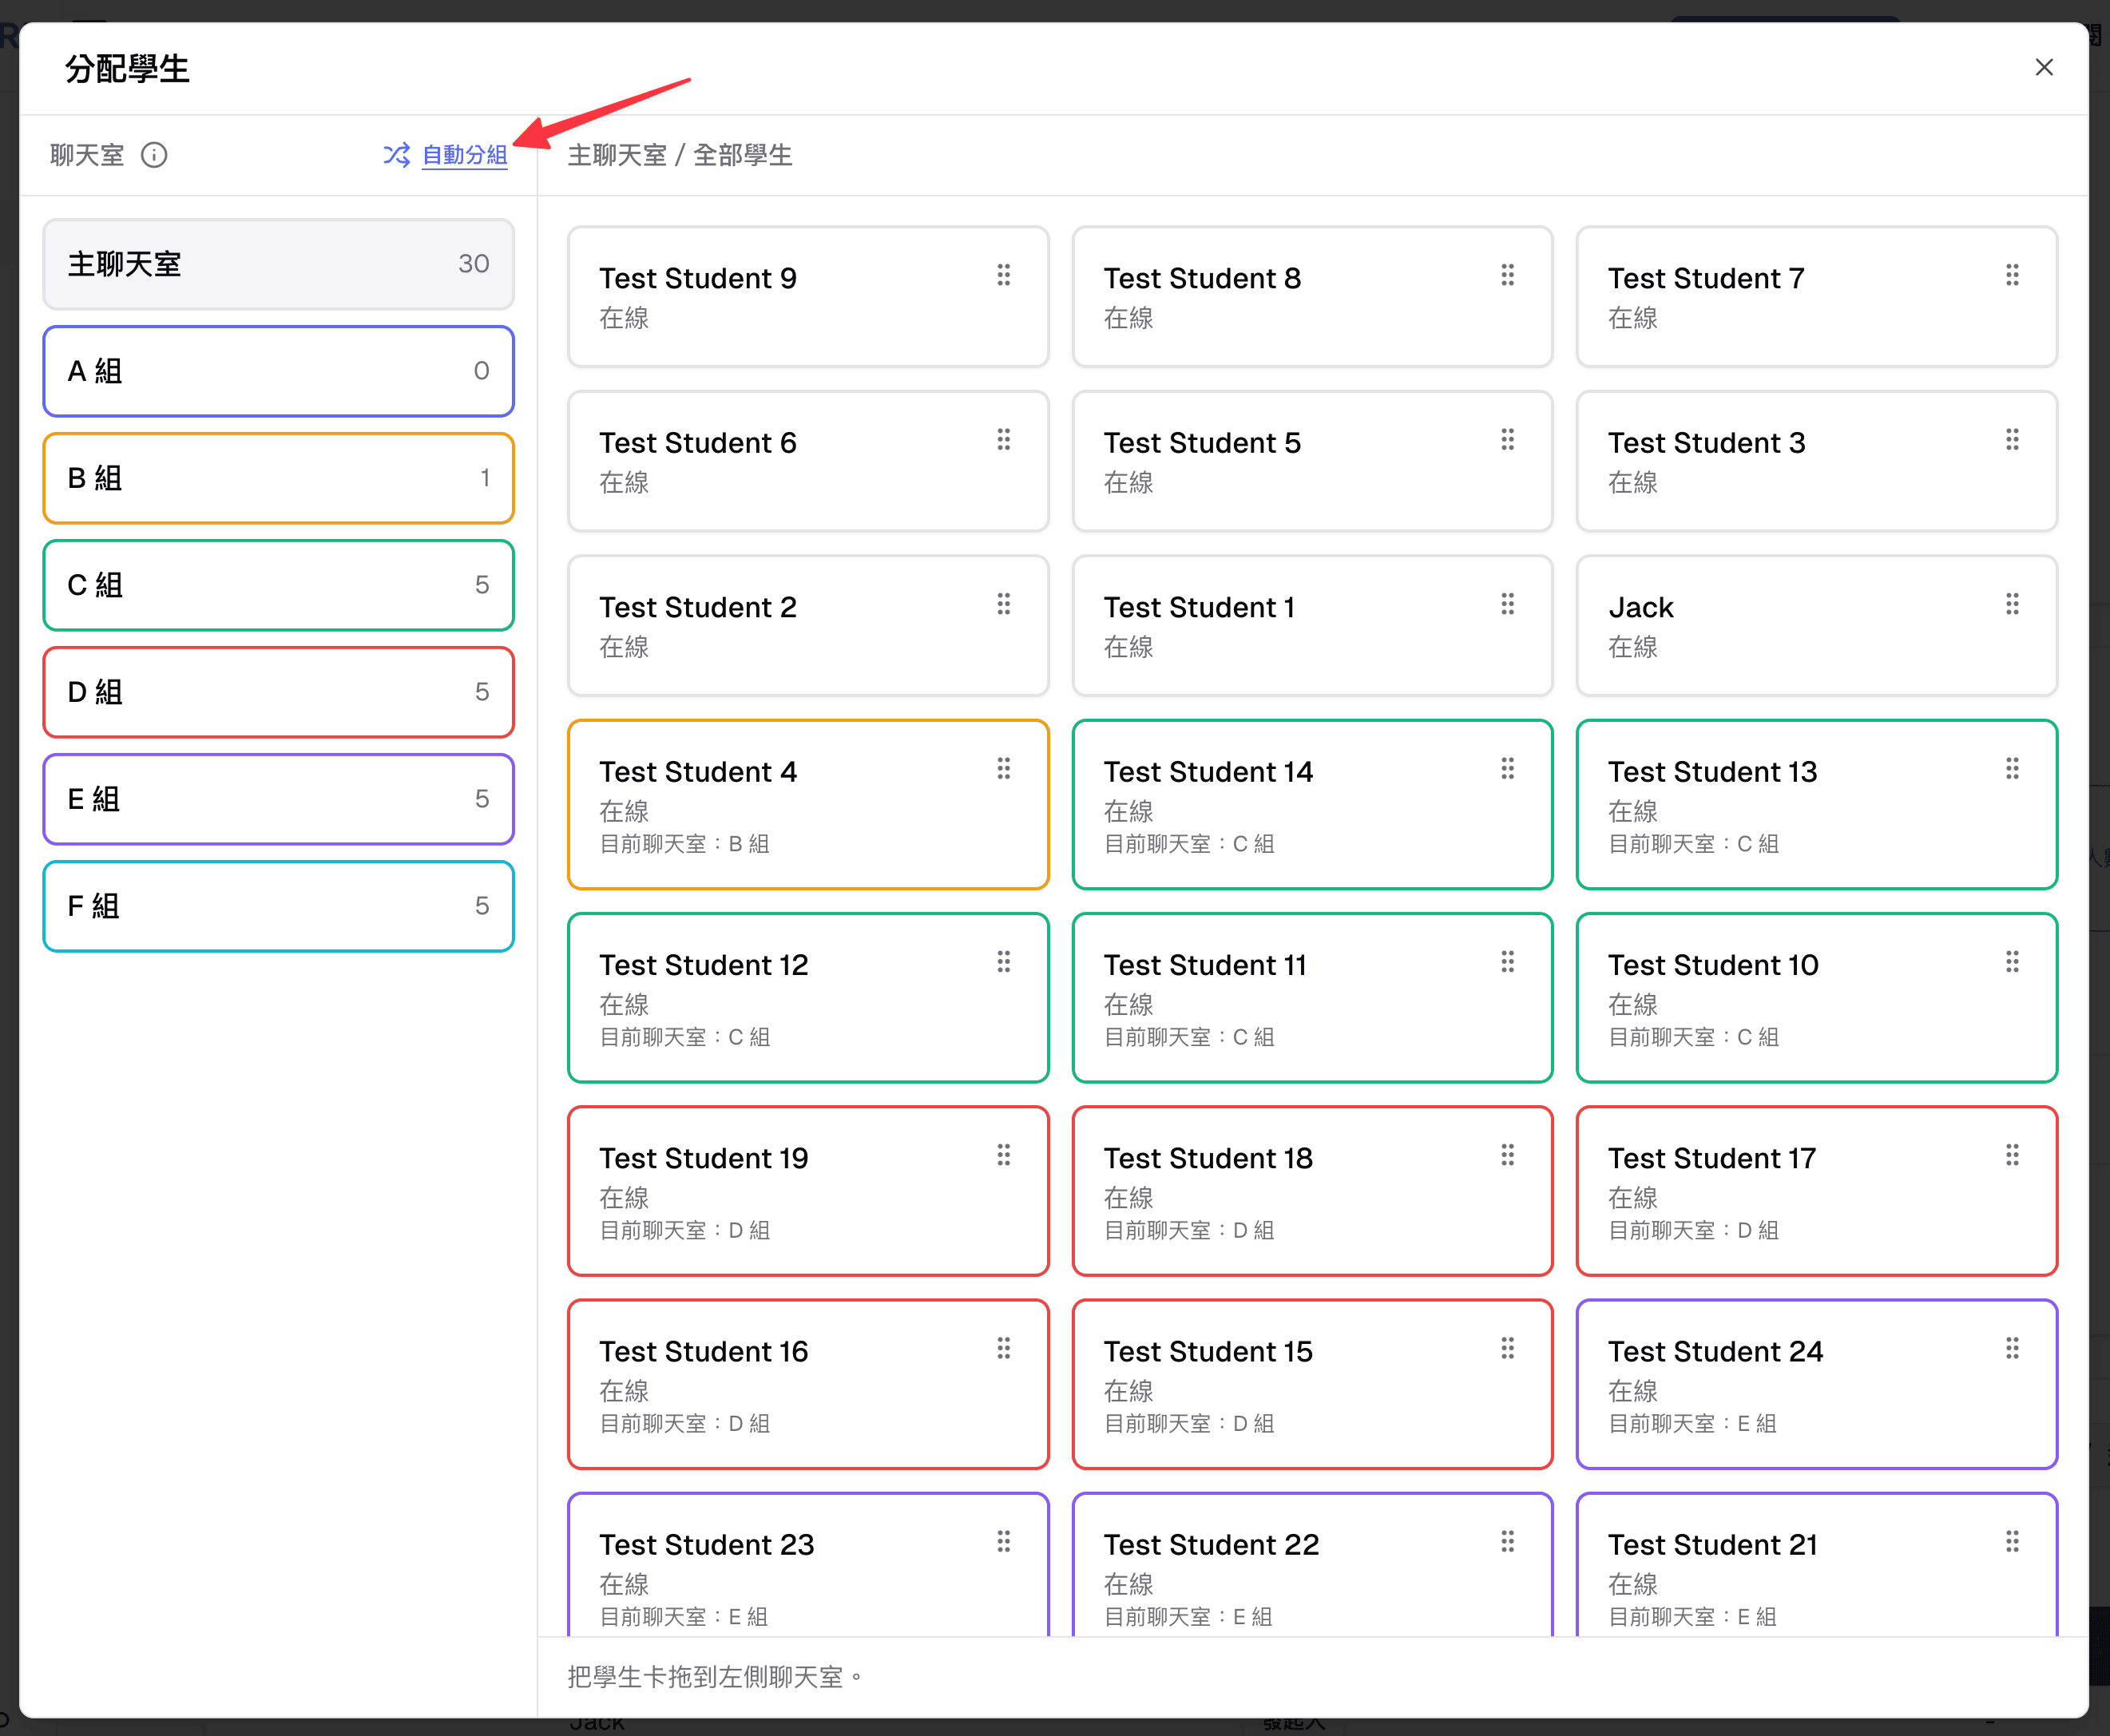
- In the dialog that opens, you can see all students listed and color-coded by their current group. Click Auto distribute to redistribute them evenly across groups.
Manually Assigning Students
You can also move individual students between rooms by drag and drop. In the dialog that opens from Assign students:
- Find the student card you want to move — each card shows the student’s name and current group
- Drag the student card to the target room on the left sidebar
- The student is moved to that room immediately
This is useful when you want to place specific students together or separate them, rather than relying on automatic distribution.
Main Chat Room vs Breakout Rooms
The main chat room is always available alongside breakout rooms. All session participants can see and use the main room. Breakout rooms are additional group spaces where smaller conversations happen in parallel.
Adding and Deleting Rooms Manually
If Enable auto breakout assignment is off, you can set up your own rooms from the Session chat rooms card on the session detail page. Only the session owner sees these controls.
- Click Add preset room
- Enter a room name and click Add preset room
- Click Assign students to place students in the rooms
To delete a room, click the trash icon on its card and confirm in the Delete chat room dialog. This cannot be undone. Students who were in that room are no longer assigned to it, and they can still use the main chat room. The main chat room cannot be deleted.
Click any room card to view that room’s chat history.
Constraints
- When auto breakout is enabled, you cannot manually create additional preset rooms — group rooms are managed automatically
- Group capacity must be between 2 and 30 students
- Each student is assigned to exactly one breakout room at a time
Teacher Features
Teacher badge: Teacher messages display a Teacher badge next to the sender name, making it easy for students to identify teacher messages in the conversation.
Online presence: The chat panel shows how many members are currently active, so you know how many students are engaged.
Chat history after session ends: After you end the session, you can view the full chat room history from the session detail page by clicking View Chat History. This lets you review everything that was discussed.
Who Can Use This
- Teachers — Send messages, share files, see the Teacher badge, delete any message, and view chat history after the session ends. Requires a Teacher plan.
- Students — Send messages, share files, share AI responses, and unsend their own messages within 30 seconds during an active session. Students cannot view chat history after the session ends.
Related Features
- Class Sessions — Session Chat Rooms are part of the class session experience
- Message Board — For posting individual AI responses to the teacher for feedback and grading (different from broadcasting to the group chat)
Common Questions
I don’t see the chat icon in the header. The chat room only appears during an active class session. Make sure you have joined or created a session that is currently live.
Can students see the chat history after the session ends? No. Only teachers can view the chat history after a session ends. Students can only access the chat while the session is active.
What is the file size limit? You can upload files up to 50 MB. Images are shown inline, and other file types appear as downloadable links.
What is the difference between Session Chat Rooms and Message Board? Session Chat Rooms are group conversations visible to everyone in the session. Message Board is a private post from a student to the teacher for individual feedback and grading. Use the chat room for class-wide communication and Message Board for individual assessment.
A student sent a message by mistake. Can it be removed? Yes. The student can unsend it within 30 seconds of sending. After that, a teacher can delete it.
Why is there a notice where a message used to be? When a message is removed, the chat shows Message unsent (removed by the sender) or Message deleted by teacher instead of the original content.
Can I send a message to a specific student? No. Session Chat Rooms are group chats — all messages are visible to every participant. For one-on-one communication, use other channels outside of Chat Everywhere v2.
Can I move a student from one breakout room to another? Yes. Click Assign students and drag the student card to the target room on the left sidebar. You can also use Auto distribute to redistribute all students at once.
What happens if I change the group capacity mid-session? Only students who join after the change are affected. Students already assigned to a group stay where they are. To reassign existing students, use Auto distribute.