In-Class Quiz
Complete automation from quiz creation to performance analysis — just provide a topic, and the AI handles the rest.
Overview
In-Class Quiz lets teachers create AI-generated quizzes in seconds. Enter a topic and your preferences, and the system generates questions, distributes them to students, collects responses, grades everything automatically, and shows you performance analytics.
You can choose from multiple question types, set difficulty levels, upload reference materials for more targeted questions, and add time limits. You also have the option to review grades before releasing them to students.
This page covers creating and publishing a quiz. To review attempts, adjust grades, and export results after students submit, see Quiz Results and Grading.
How to Access
- Go to the Teacher Portal
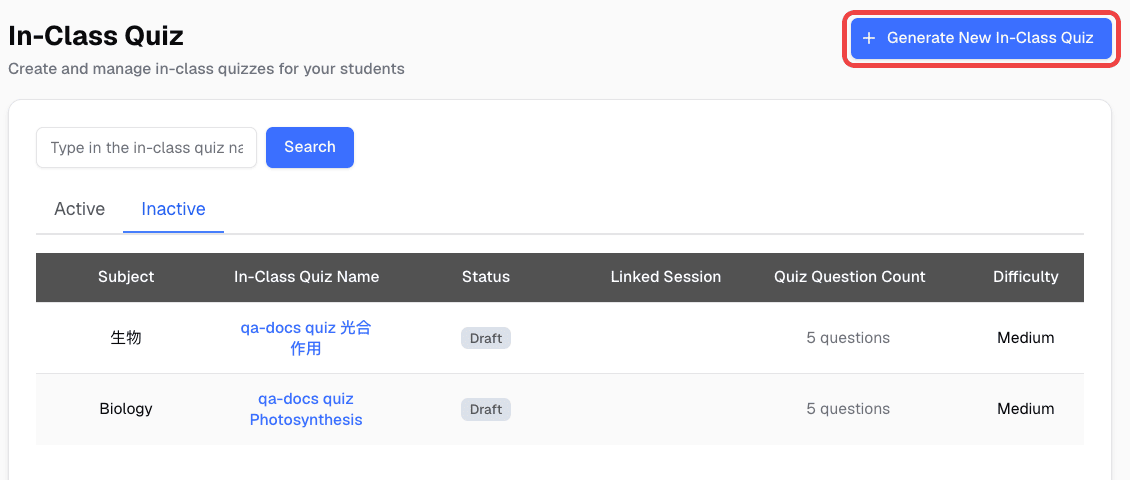
- Click In-Class Quiz in the sidebar
- Click Generate New In-Class Quiz
What You Can Do
- AI-powered question generation — Enter a topic and get questions generated automatically
- Multiple question types — Single Select, Multi Select, and Text questions
- Three difficulty levels — Easy, medium, and hard
- Generate from files — Upload reference materials and generate questions from their content
- Multiple random sets — Create randomized versions to prevent copying between students
- Time limits — Set how long students have to complete the quiz
- Test grading — Try a sample answer against your grading instruction before publishing
- Question editing tools — Regenerate, reorder, add, or remove questions before publishing
- Auto-grading — AI grades all responses, including written answers, using your custom rubric
- Hold grades — Review grades yourself before releasing to students
- Collect extra info — Ask students for details like student ID or seat number before the quiz starts
- Dedicated quiz links — Share quizzes via a direct URL or QR code (no class session needed)
- Results, grading, and exports — Performance analytics, grade overrides, regrade requests, and PDF exports. See Quiz Results and Grading
Step-by-Step Guide
Create a Quiz
- Click Generate New In-Class Quiz
- Fill in the basics:
- Topic — What the quiz is about (e.g., “Photosynthesis”)
- Subject — The academic subject area
- Language — Which language to generate questions in
- Difficulty — Easy, medium, or hard
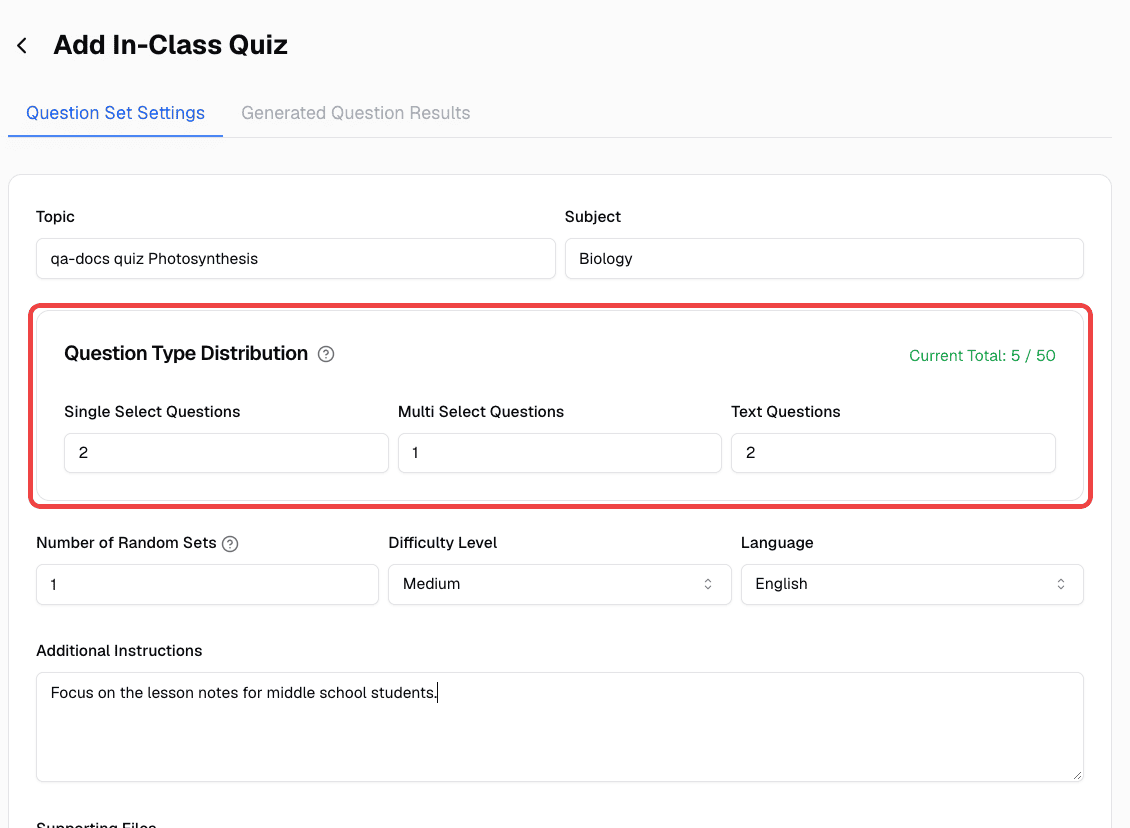
- Choose how many of each question type you want:
- Single Select Questions — Multiple choice with one correct answer
- Multi Select Questions — Multiple choice with several correct answers
- Text Questions — Short answer or open-ended
- Optionally configure:
- Number of Random Sets — How many randomized versions to create
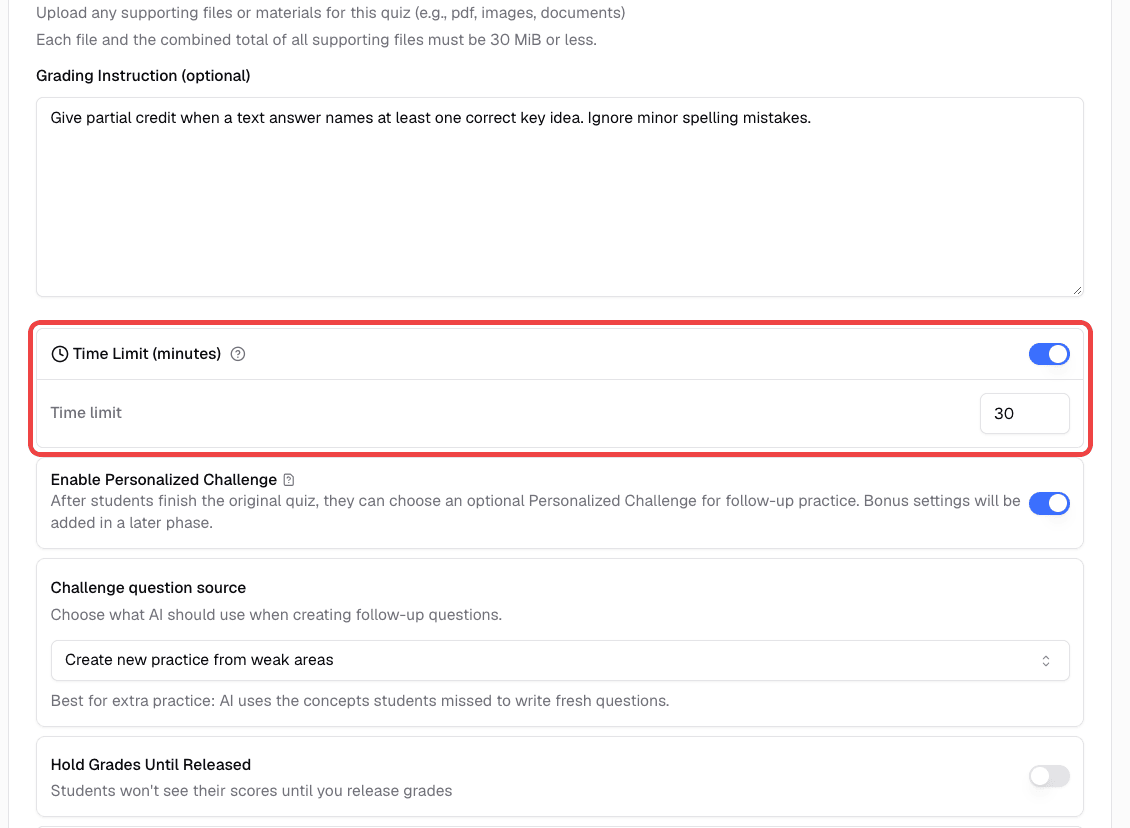
- Time limit — How many minutes students have. Leave it empty for unlimited time
- Additional instructions — Guide what kind of questions the AI should generate
- Grading Instruction (optional) — Your custom rubric for grading answers. See Set Grading Instructions and Test Grading
- Personalized Challenge — Offer tailored follow-up practice after grading. See Personalized Challenge
- Hold Grades Until Released — Turn this on to review grades before students see them. You can turn it off later to release grades, even after the quiz is published
Quiz Limits
Keep these limits in mind when you set up a quiz:
| Setting | Limit |
|---|---|
| Questions | Up to 50 in total across all question types (shown as Current Total) |
| Number of Random Sets | 1 to 5 |
| Supporting Files | Each file, and all files combined, must be 30 MiB or less |
| Question images | JPEG, PNG, GIF, or WebP, up to 10 MB each |
| Student image answers | Up to 5 images per text question |
How random sets work: Each set contains a different version of the questions, and each student is randomly assigned one set. This makes it harder for students to copy from each other, but it also means students do not all answer the same questions. When you review results, you can filter by set to compare students who answered the same version.
Questions lock when you publish. After you publish to a class session or create a dedicated link, you can no longer edit, add, remove, regenerate, or reorder questions, and the grading instruction becomes read-only. To make changes to a published quiz, click Duplicate Quiz and edit the copy.
Collect Extra Info from Students (Optional)
You can ask students to fill in details like student ID, class section, or seat number before they start the quiz. This info appears alongside their results so you can identify and organize attempts more easily.
In the quiz settings, find the Collect Extra Info switch and turn it on.
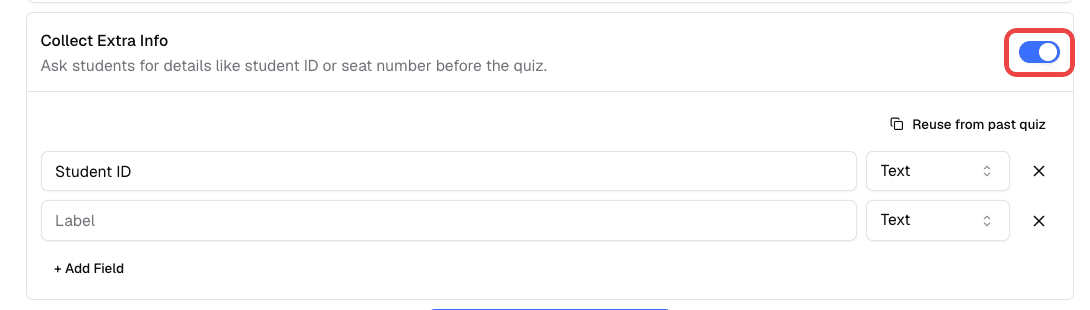
Once it is on:
- Click Add Field and enter a label (e.g., “Student ID”)
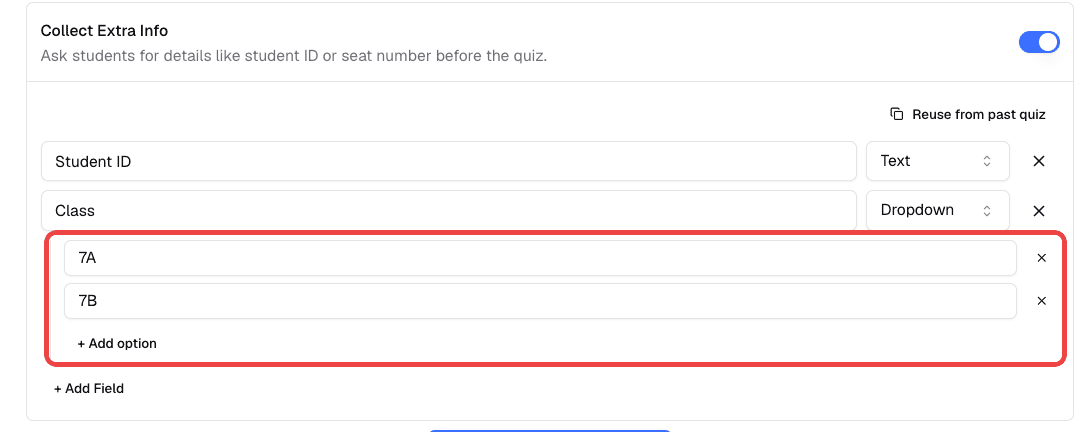
- Choose the field type — Text lets students type their answer freely, and Dropdown lets them pick from options you define
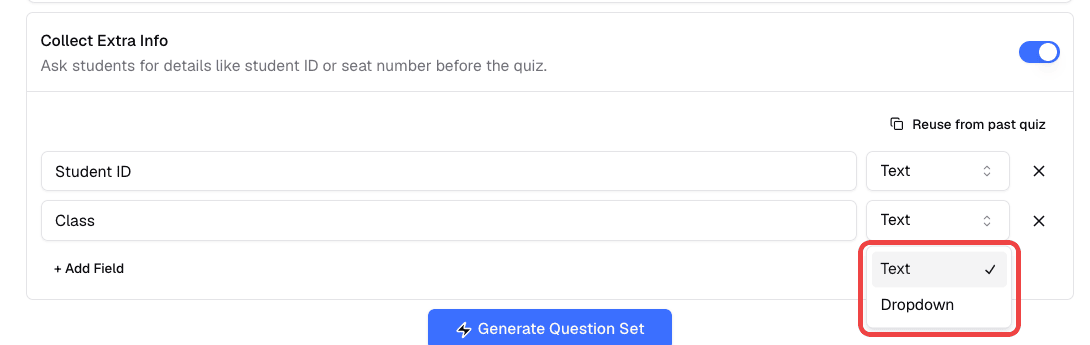
- For dropdown fields, click Add option to add each choice
- Add as many fields as you need — you can reorder or remove them at any time
If you’ve set up these fields on a previous quiz, click Reuse from past quiz to copy them over instead of starting from scratch.
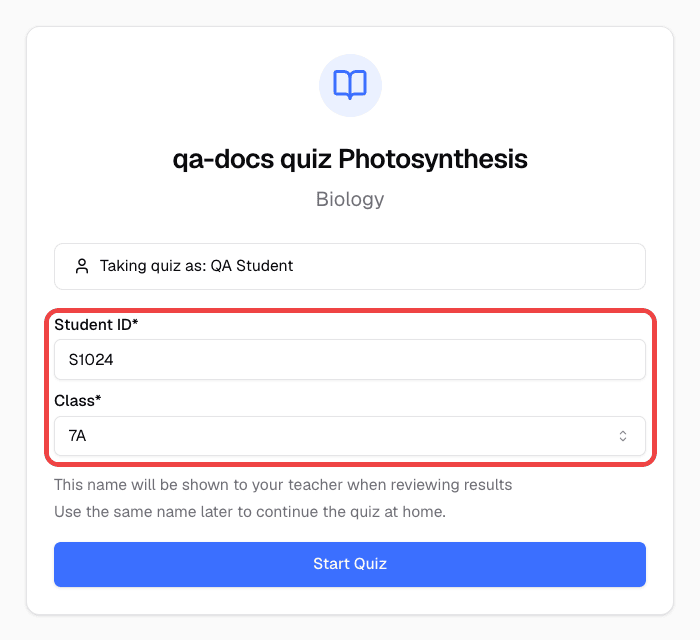
Students see these fields on a form before the quiz begins. All fields are required — they must fill in every field before they can start.
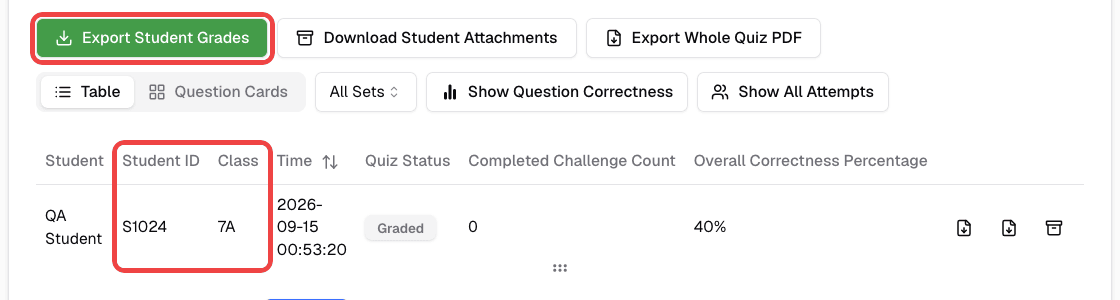
After students submit, the fields you defined appear as separate columns in the results table so you can review them alongside each attempt. These fields are also included when you export student results.
Generate from Your Own Materials (Optional)
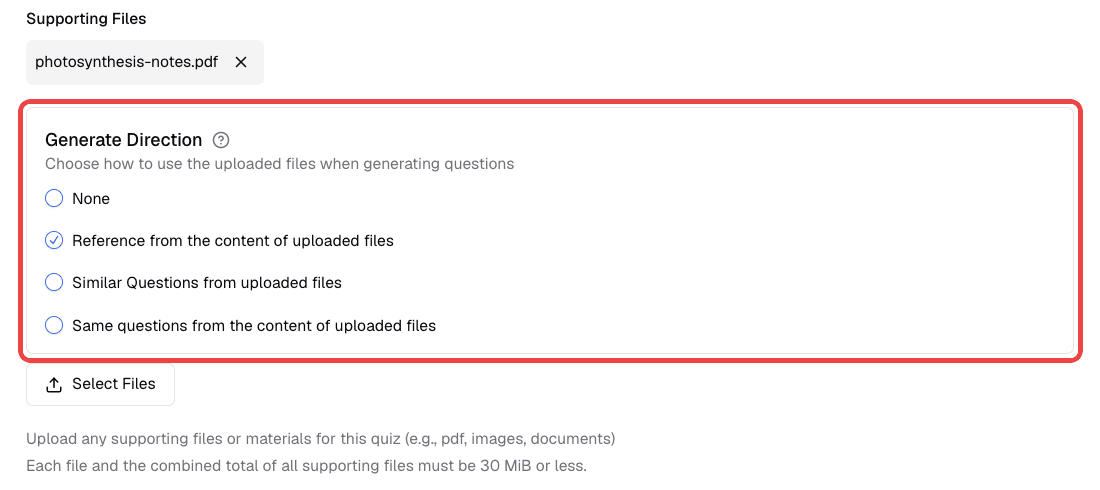
If you have existing materials you’d like to base the quiz on, upload them under Supporting Files (PDFs, images, or documents) and choose a Generate Direction:
- Reference from the content of uploaded files — The AI uses your files as context for creating new questions
- Similar Questions from uploaded files — Generate questions similar to the ones in your files
- Same questions from the content of uploaded files — Pull the exact questions from your uploaded files
Each file, and all supporting files combined, must be 30 MiB or less. If the files are too large, question generation is blocked until you remove some.
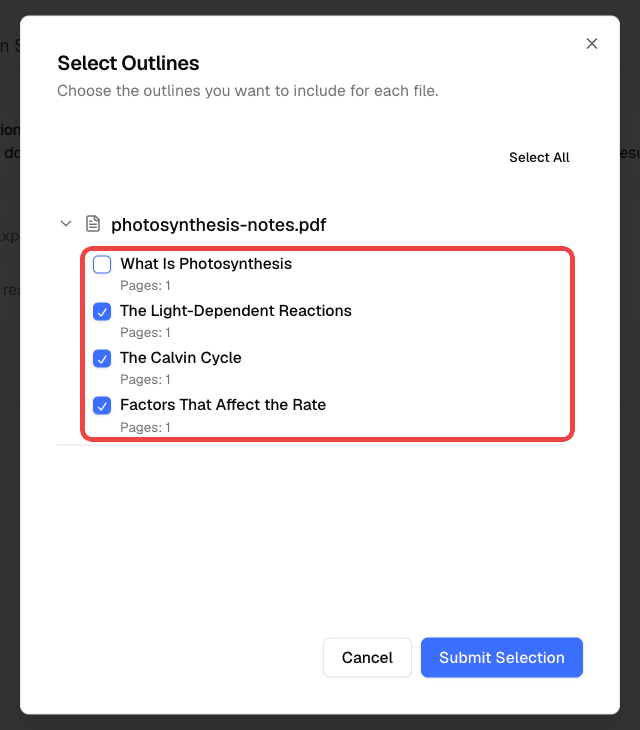
When you click Generate Question Set with PDF files attached, the Select Outlines dialog lists the sections found in each file. Select the chapters or content range that should be used for question generation, then click Submit Selection. This keeps the quiz focused on the exact lesson content you want to assess. The dialog is skipped when a file has only one section or when you choose Same questions from the content of uploaded files.
You can also review this sample material when preparing quiz material from your own files.
Review and Edit Generated Questions
After the AI generates the quiz, open the Generated Question Results tab and review the questions before publishing. If the quiz has several random sets, use the set menu to switch between them.
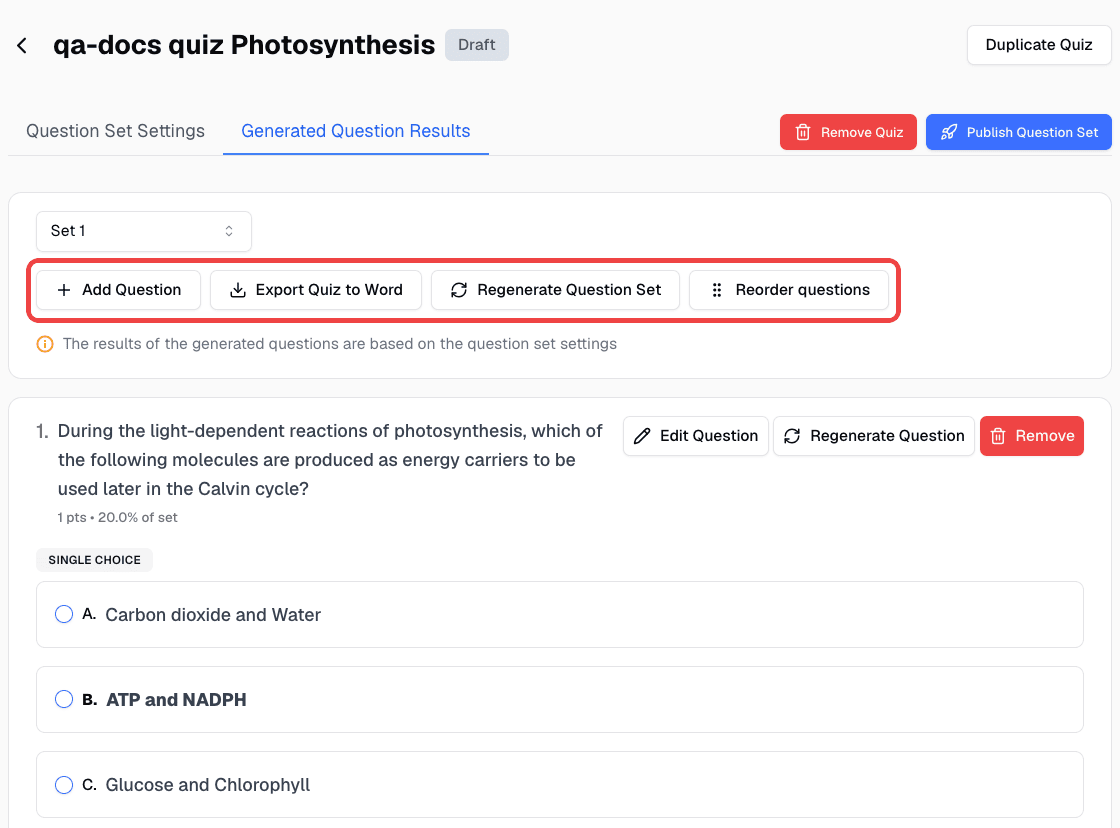
These tools are available until you publish:
- Edit or remove a question — Change the question text, options, correct answer, or points, or delete a question you don’t need
- Add Question — Write your own question and add it to the selected set
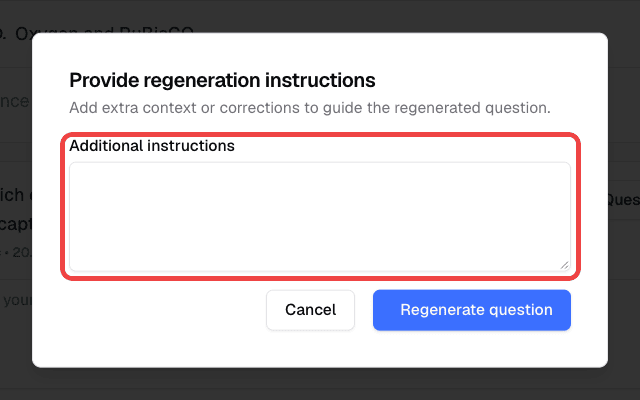
- Regenerate Question — Replace one question without rebuilding the quiz. In Provide regeneration instructions, add optional Additional instructions (for example, “make it about the light reactions” or “the answer options were too similar”), then click Regenerate question. The new question keeps the same question type and set
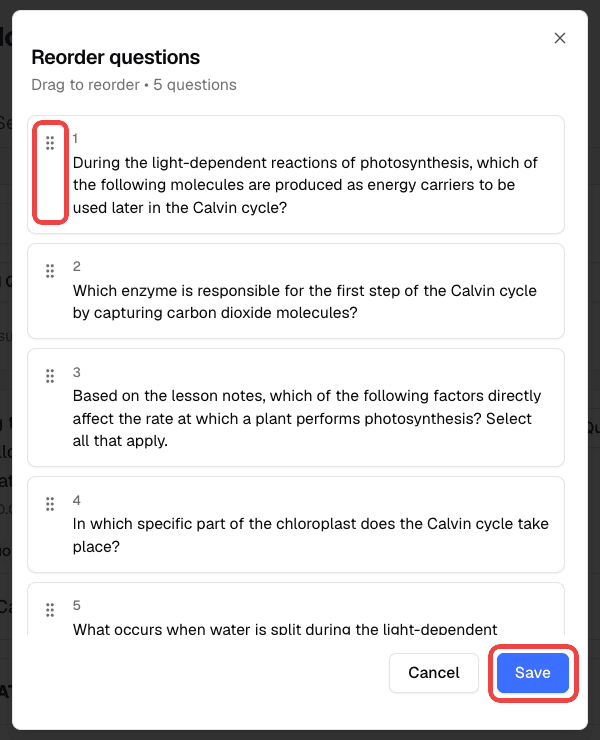
- Reorder questions — Click Reorder questions, drag questions into a new order, then click Save. This changes the order in the selected set and appears when the set has more than one question
- Regenerate Question Set — Generate the whole quiz again from the current settings
- Retry missing sets — If you see Question generation is incomplete, some questions were not generated. Click Retry missing sets to fill in what is missing. If you publish without retrying, students only see the questions that were generated
- Export Quiz to Word — Download the selected set as a Word document for printing or offline use
Duplicate Quiz is available at the top of the quiz page at any time, including after publishing. It creates a new draft named “Copy of” followed by the original title, with the same settings, supporting files, questions, and question images. The copy is not linked to any class session, so you can edit and publish it separately.
Add Question Images (Optional)
When you edit or add a question, you can attach an image under Question Image (Optional, AI model will not use this image as context). Click Select Image and choose a JPEG, PNG, GIF, or WebP file up to 10 MB.
Students see the image with the question. As the label says, the AI does not look at this image when it grades, so make sure the question text and reference answer contain everything needed to grade the answer.
Set Grading Instructions and Test Grading
The Grading Instruction (optional) field tells the AI how to score answers. Use it to describe your rubric, such as which key points earn partial credit, whether spelling matters, or how strict to be with wording. The AI follows your instruction when it grades every student attempt. For details on how scores are calculated, see How AI Grading Works.
Before publishing, check that the instruction produces the grades you expect:
- In Question Set Settings, enter your rubric in Grading Instruction (optional)
- Click Save in the field. You’ll see “Grading instruction saved”
- Open the Generated Question Results tab
- Answer a question the way a student might — for example, a partially correct text answer
- Click Test Grading next to that question. The button appears once you enter an answer
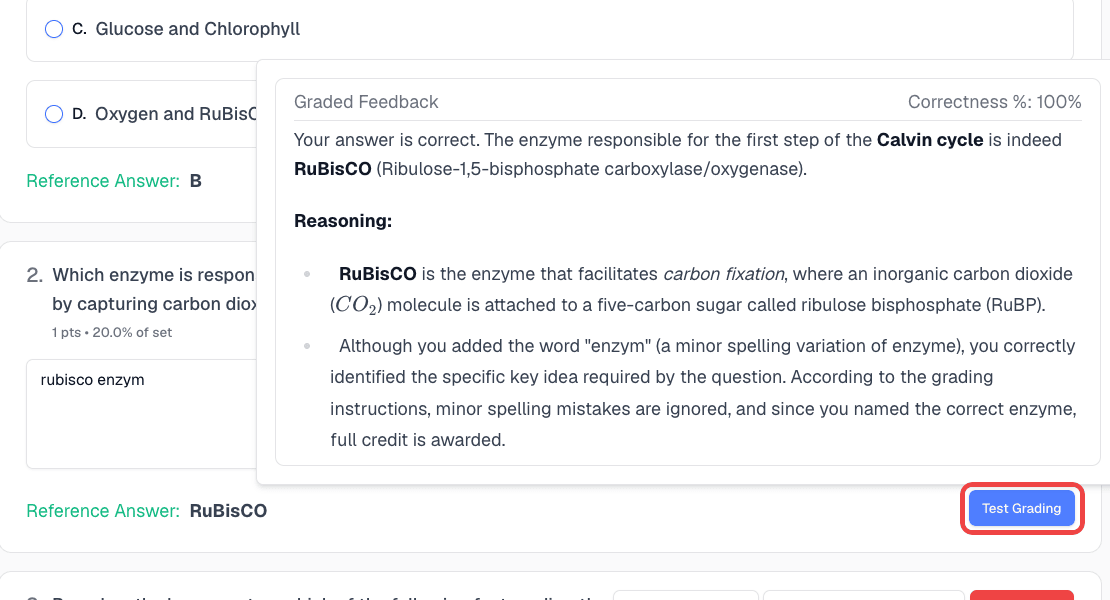
- Review the score and feedback, then adjust the instruction and test again if needed
Test Grading uses the saved instruction, so save your changes before testing. Test results are not stored and do not affect student grades. The grading instruction can’t be changed after the quiz is published.
Publish to a Class Session
- Click Publish Question Set
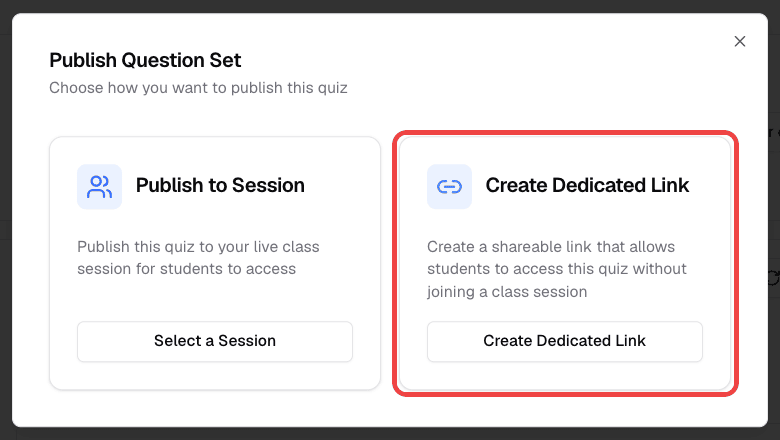
- Click Publish to Session
- Select a live or scheduled class session and publish. Once published, the questions can’t be updated
Students who have joined the session see the quiz in their Class Portal. See Class Sessions.
Publish with a Dedicated Link
A dedicated link lets students open the quiz from anywhere without joining a class session.
- Click Publish Question Set, then choose Create Dedicated Link
- Under Access Settings, optionally enter an Access Code (Optional). Students must enter this code to open the quiz. Codes can be up to 20 characters and are converted to uppercase
- Set the Expiration Date & Time. This is required and defaults to one hour from now. The time is in GMT+8 (Taiwan time), and a preview shows exactly when the link expires
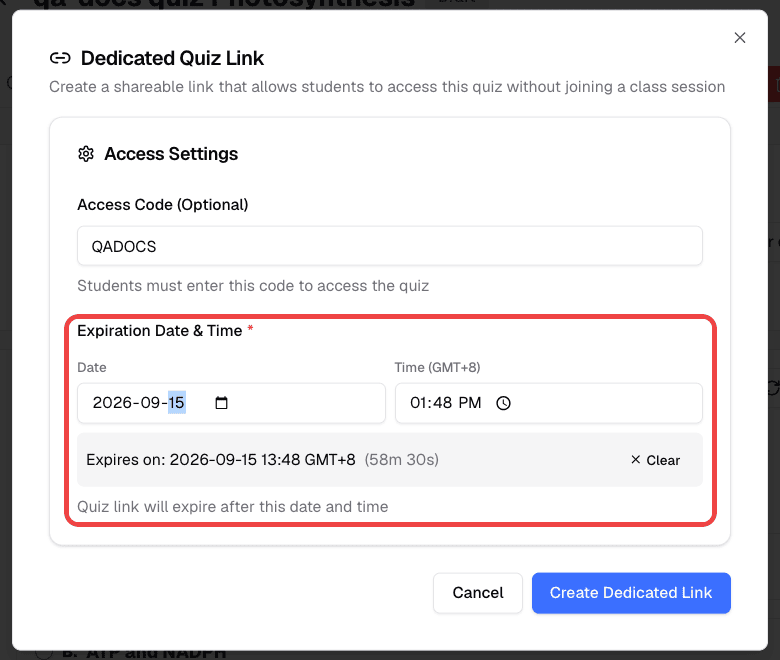
- Click Create Dedicated Link, review the confirmation, and click Create Link. The confirmation reminds you that you won’t be able to edit the quiz questions after creating the link
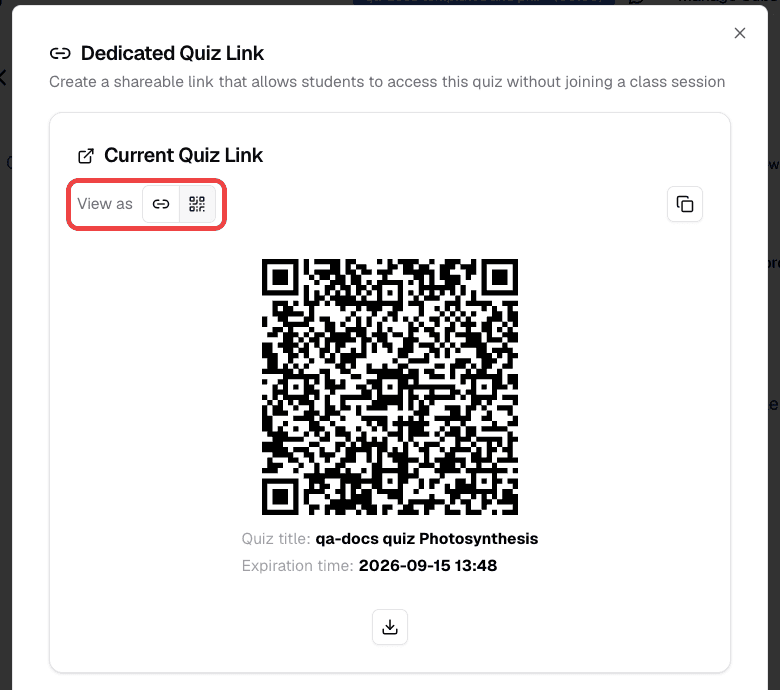
- Share the link with students. Under Current Quiz Link, use View as to switch between Link and QR Code. Click Download QR to save a QR image with the quiz title and expiration time, or use Copy details to Copy link or Copy all details (title, link, access code, and expiration time)
Manage or End a Dedicated Link
Click Manage Link on the quiz page to reopen the link settings:
- Update Settings — Change the access code or extend the expiration date and time
- Disable Link — Turn off the link. Anyone who opens the old URL sees “Quiz not found or link is invalid.” If you create a new link later, it has a new URL
- End quiz now — Available on the quiz page while the quiz is published. Students can no longer start or submit the quiz and see “This quiz has ended”
When the expiration time passes, students who open the link see “Quiz link has expired.” To reopen the quiz, click Manage Link and set a later expiration time.
What Students See
Opening a dedicated link. Students see the quiz title and subject, then fill in:
- Your Name (if needed), which you see in the results. Students can come back later on the same device and use the same name to resume an unfinished attempt
- Any Collect Extra Info fields you added
- The Access Code, if you set one. Students see Access Code Required and must enter the code before continuing
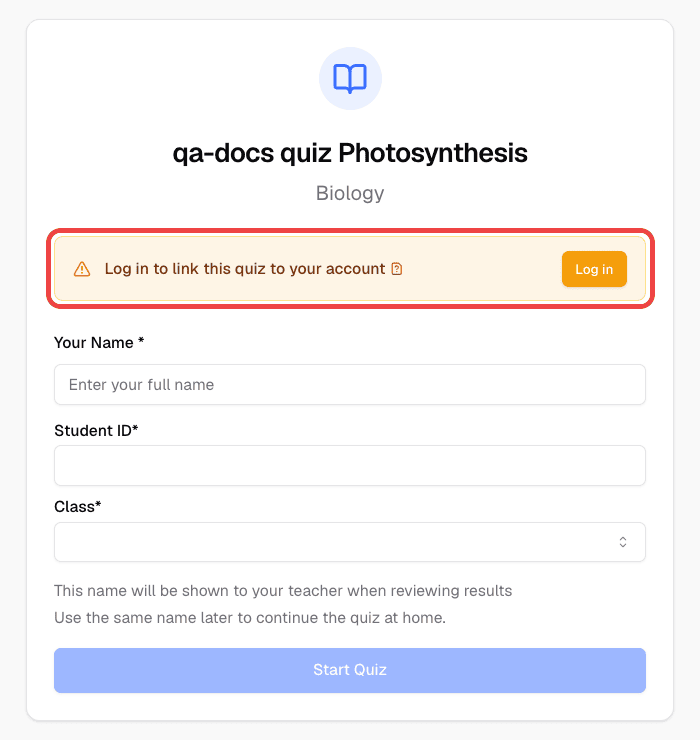
Students who are not signed in see “Log in to link this quiz to your account.” Signed-in attempts are saved to the student’s Past Quiz History; attempts started without signing in are not. See Review Past Quiz History as a Student.
Opening a quiz from a class session. Students open the quiz from In-Class Quiz in their Class Portal. If you added extra info fields, they see a Before you start form first.
Answering questions. For text questions, students can type an answer, upload up to 5 photos (for example, of written work), or draw with New Handwriting Answer. The AI reads the text from these images and grades it. If an image contains no readable text and nothing is typed, the student is asked to add an answer.
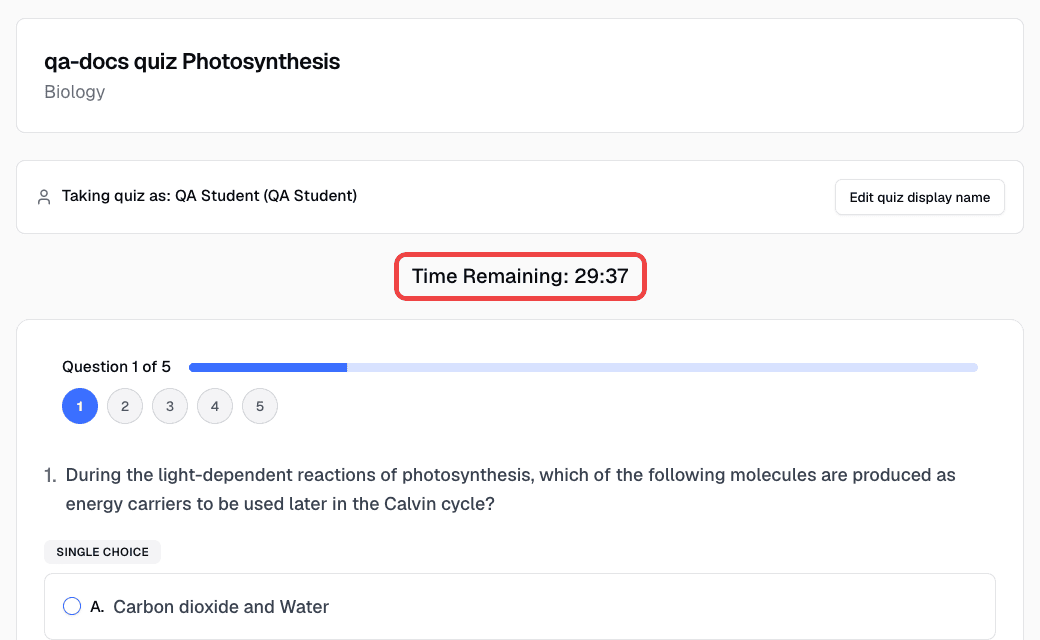
Time limits. If you set a time limit, students see Time Remaining while they work. When time runs out, they see “Quiz time has expired, answers have been auto-submitted” and their current answers are submitted automatically.
After submitting. Students see their grading status and can open View Results once grading finishes. If you are holding grades, they see “We’ve received your submission. Thank you!” instead of a score.
After Students Submit
Grading starts automatically when each student submits. To view results, generate a class summary, edit grades, respond to regrade requests, release held grades, or export PDFs and spreadsheets, see Quiz Results and Grading.
Review Past Quiz History as a Student
Students can revisit submitted in-class quizzes from Past Quiz History when the attempt is linked to their signed-in Chat Everywhere account.
This applies to:
- quizzes opened from an active class session
- quizzes opened through a dedicated link after the student logs in
If a student opens a dedicated quiz link before signing in, they will see a prompt encouraging them to log in so the quiz can be saved to their account history.
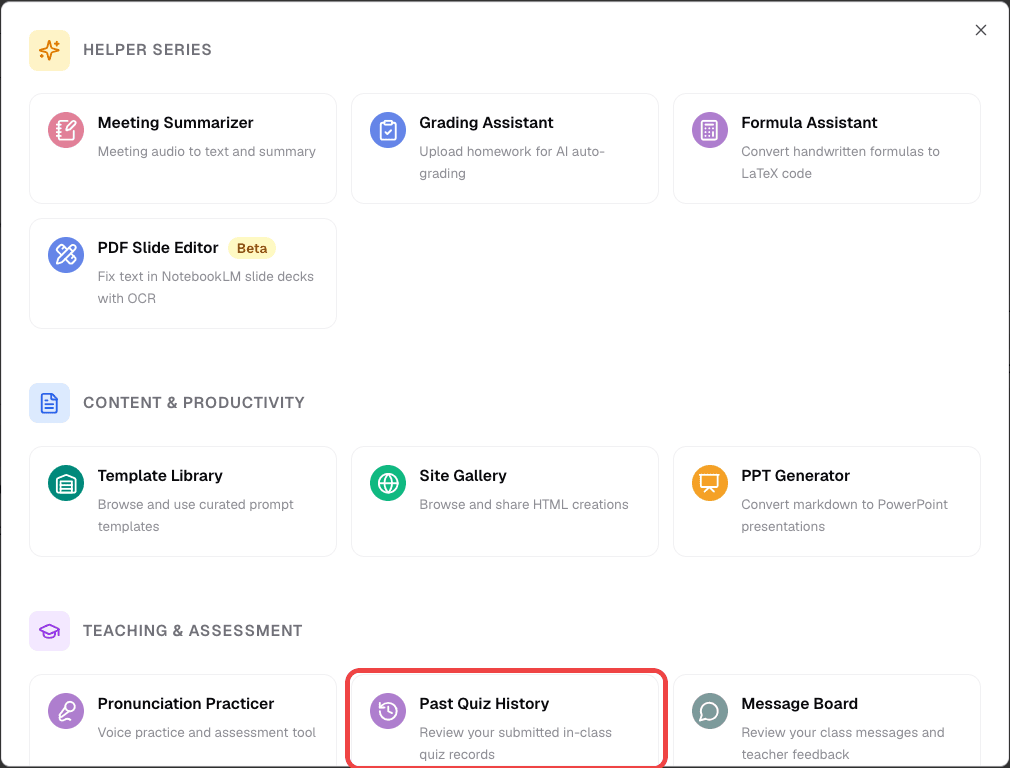
To review past quizzes later:
- Sign in with the same account used for the quiz attempt.
- Open the left sidebar.
- If you do not see it directly in the sidebar, click Other Features first.
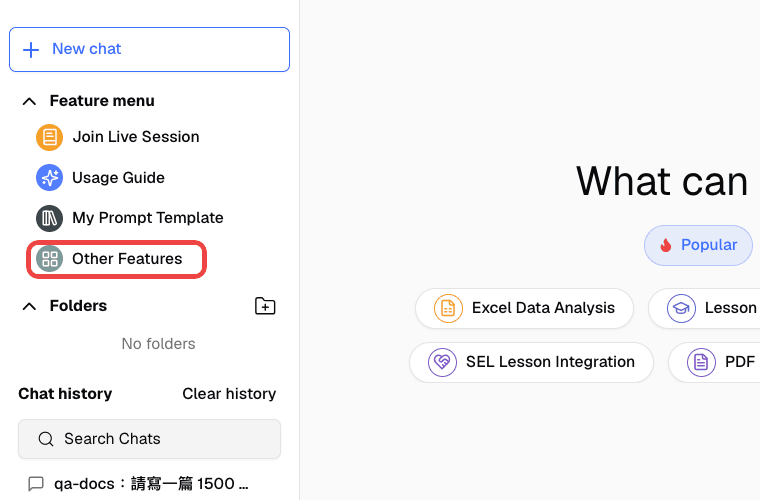
- Click Past Quiz History from the sidebar or from Other Features.
- Select a submitted quiz to open the detail view.
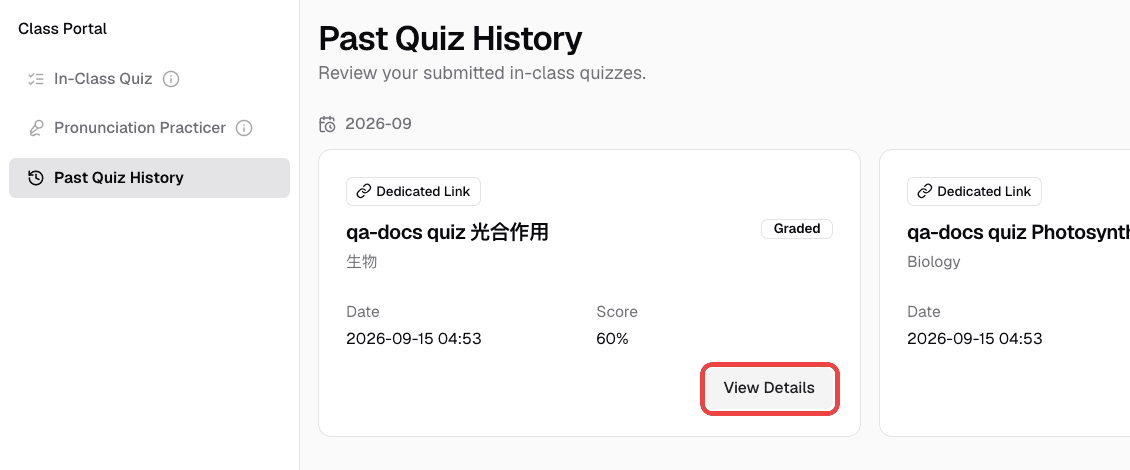
Keep these limits in mind:
- Only submitted quizzes linked to the student’s signed-in account appear in this history.
- Quizzes started fully anonymously do not get added retroactively just by logging in later.
- Submitted quiz records appear here after grading starts.
- If the teacher is holding grades, the quiz record may appear before the score is released.
Who Can Use This
- Teachers — Create, edit, publish, and close quizzes. View all student attempts and analytics.
- Students — Take quizzes assigned by their teacher and view their own results (once released).
- This feature requires a Teacher plan.
Related Features
- Quiz Results and Grading — Review attempts, edit grades, and export results
- Class Sessions — Distribute quizzes through live sessions
- Prompt Templates — Guide student AI usage alongside quizzes
- Personalized Challenge — Offer tailored follow-up practice after a quiz
- Message Board — Review student work outside of quizzes
Common Questions
Students can’t see the quiz. Make sure you’ve published it. If sharing through a class session, confirm students have joined. If using a dedicated link, double-check they have the right URL and that the link hasn’t expired or been disabled.
I need to change a question after publishing. Published questions are locked. Click Duplicate Quiz, edit the copy, and publish the copy instead.
Students see “Quiz link has expired” or “Quiz not found or link is invalid.” The first means the expiration time has passed — click Manage Link and set a later time. The second means the link was disabled or the URL is wrong. Share the current link from Manage Link.
The generated questions aren’t what I expected. Try adding more detail to the Additional instructions field, changing the difficulty level, or uploading reference files so the AI has better context. To fix a single question, use Regenerate Question with extra instructions.
Grading seems stuck or a score looks wrong. See Quiz Results and Grading to retry failed grading or edit a grade.